Whether you want to track paid or organic search performance, the Position Tracking Overview tab is where you can see a summary of your domain’s visibility, estimated traffic, and average position for every keyword you’re tracking. Tracking both your paid and organic keywords can give you the full picture of your site’s visibility on search.
There is also a Rankings Overview at the bottom of the report where you can identify your and your competitor’s positions and manage the keywords in your campaign. Use the table of contents to the right to jump to a specific section.
Visibility Trend
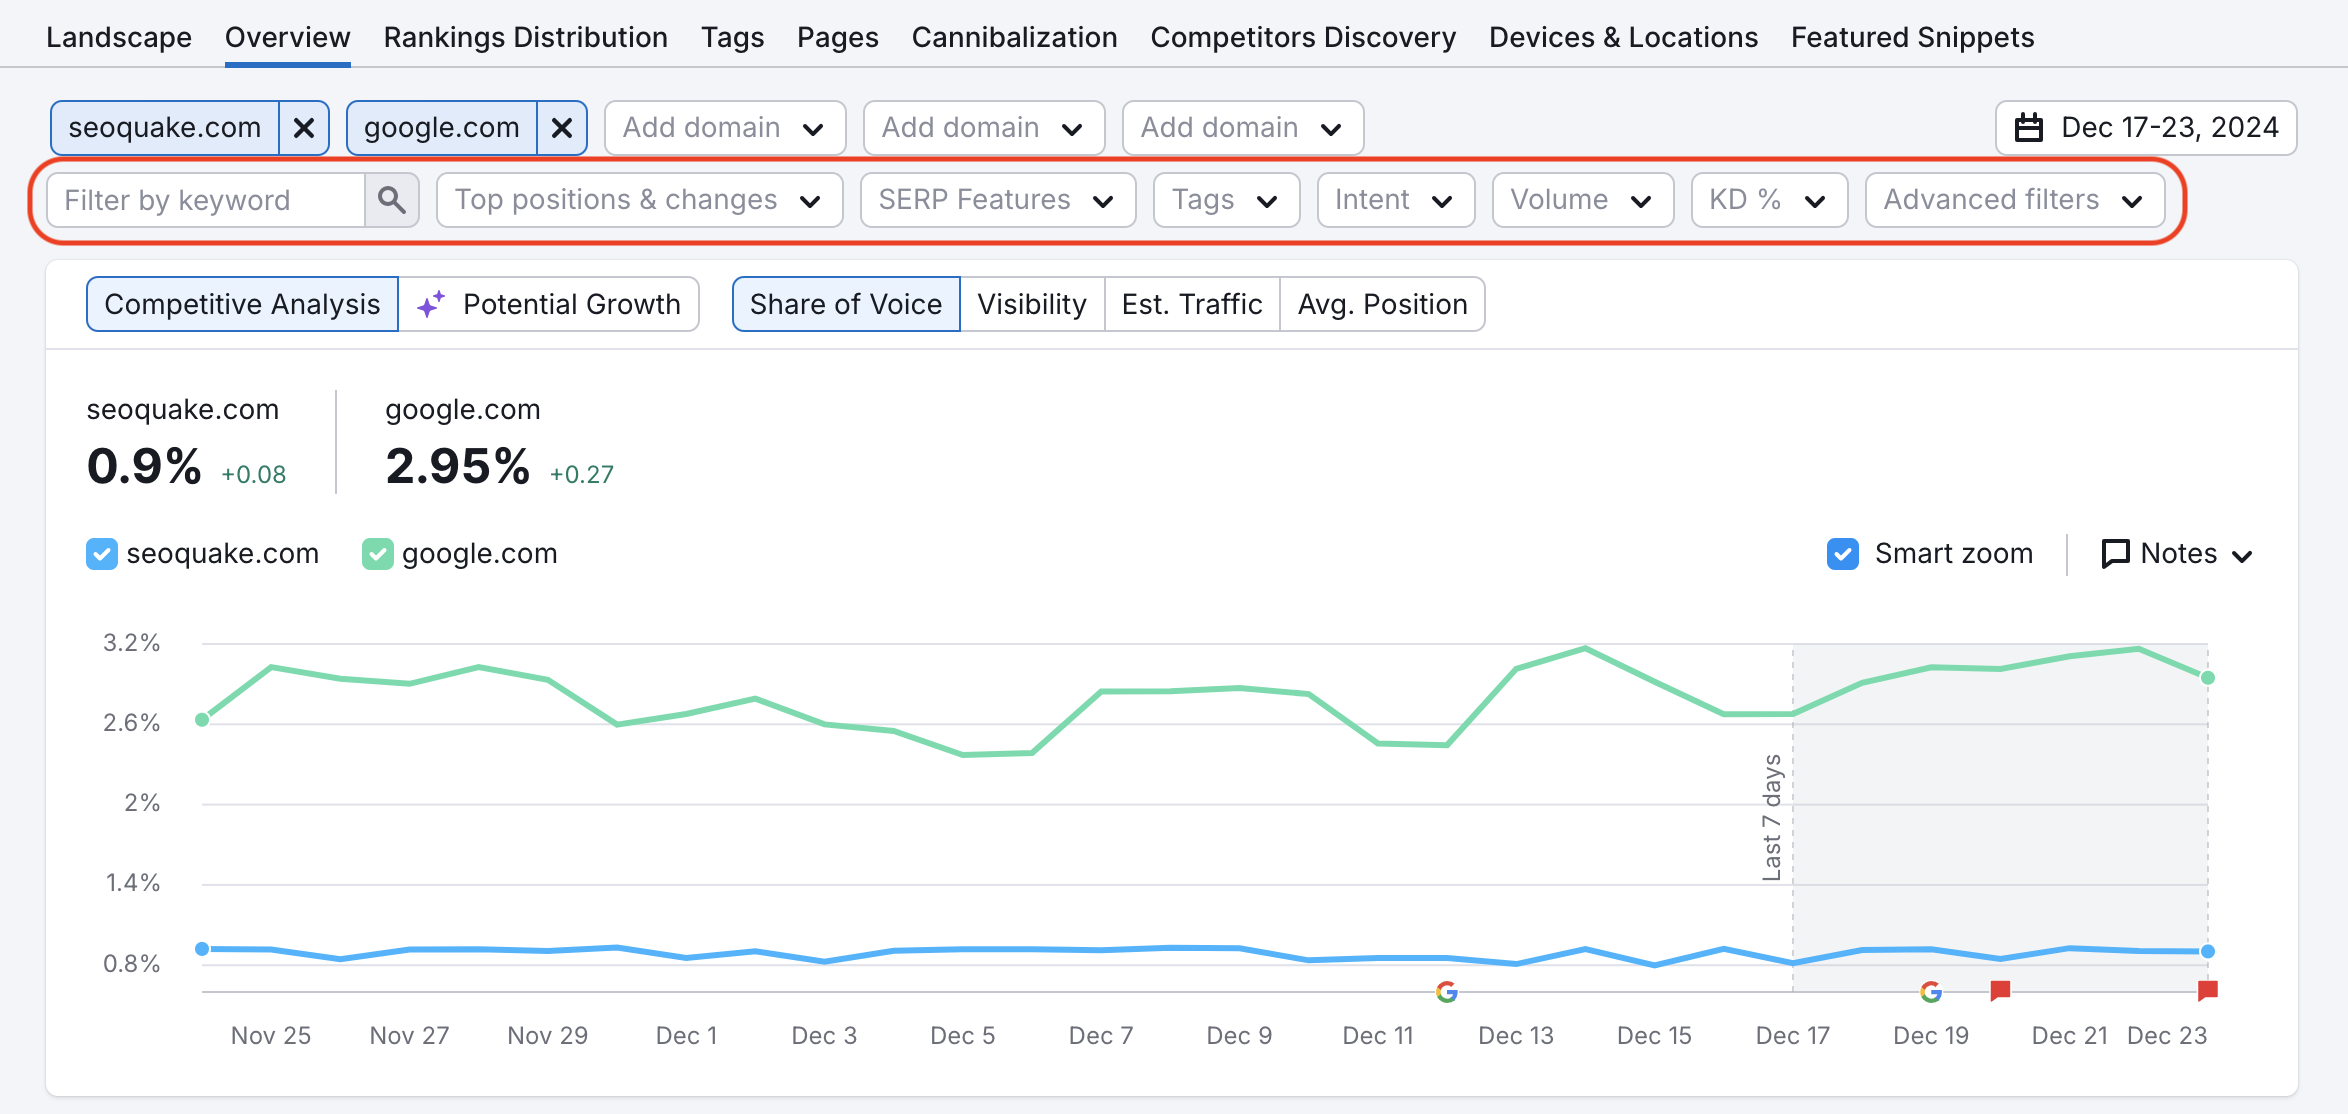
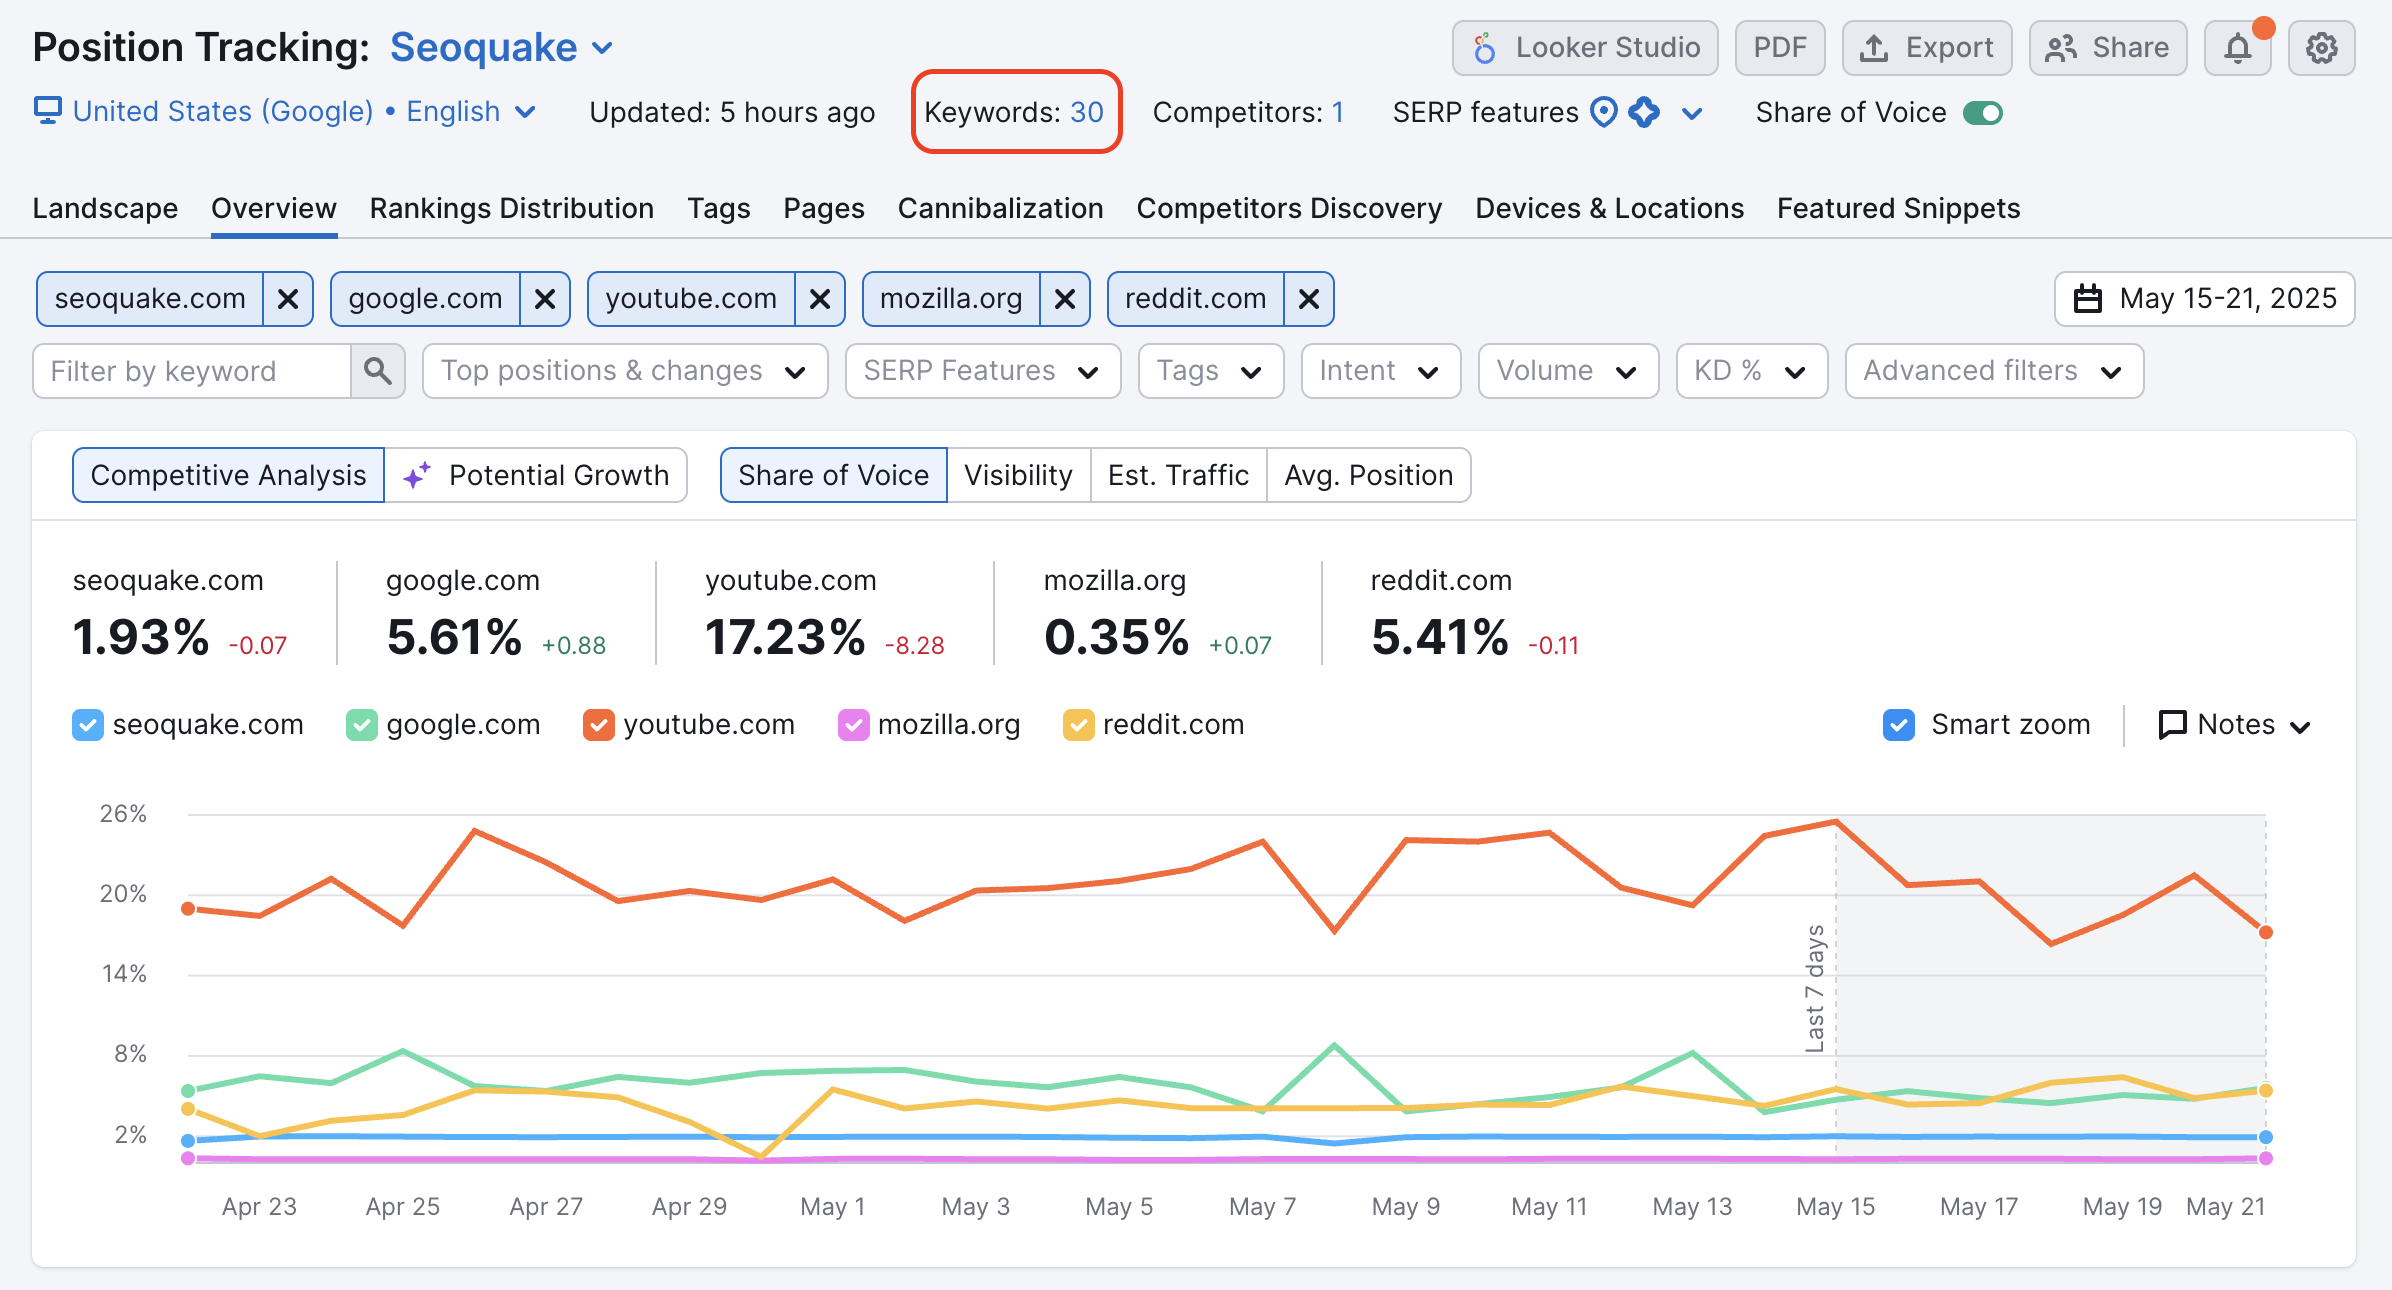
The first thing you’ll see when you open the Overview tab will be the Visibility Trend chart.
Visibility % is a metric based on click-through rate (CTR) that shows a website’s progress in Google’s top 100 for keywords from the current tracking campaign. This metric represents how visible the domain is among searchers for keywords in your campaign.
For example, if a domain had no rankings in Google’s top 100 results for any of its target keywords, it would have a Visibility % of 0%.
If the domain had the first position for every keyword in the campaign, it would have a Visibility % of 100%.
In addition to following you and your competitors’ Visibility %, you can alter this graph to show trends in Estimated Traffic and Average Position. Just click on the different headers above the graph and watch the trends change.
Estimated Traffic is calculated to represent the estimated number of visits to a domain. This metric can change on a daily basis but the number is an estimation of daily traffic based on the domain or URL’s current positions.
Average Position is the average of all your rankings for the keywords in your campaign. For any keyword where you aren’t ranking, it will be calculated as a ranking of 100.
Each of these charts can be a way to measure improvement as a result of your SEO or PPC efforts, as an increase in estimated traffic or a lower average position would both signify moving in a positive direction.
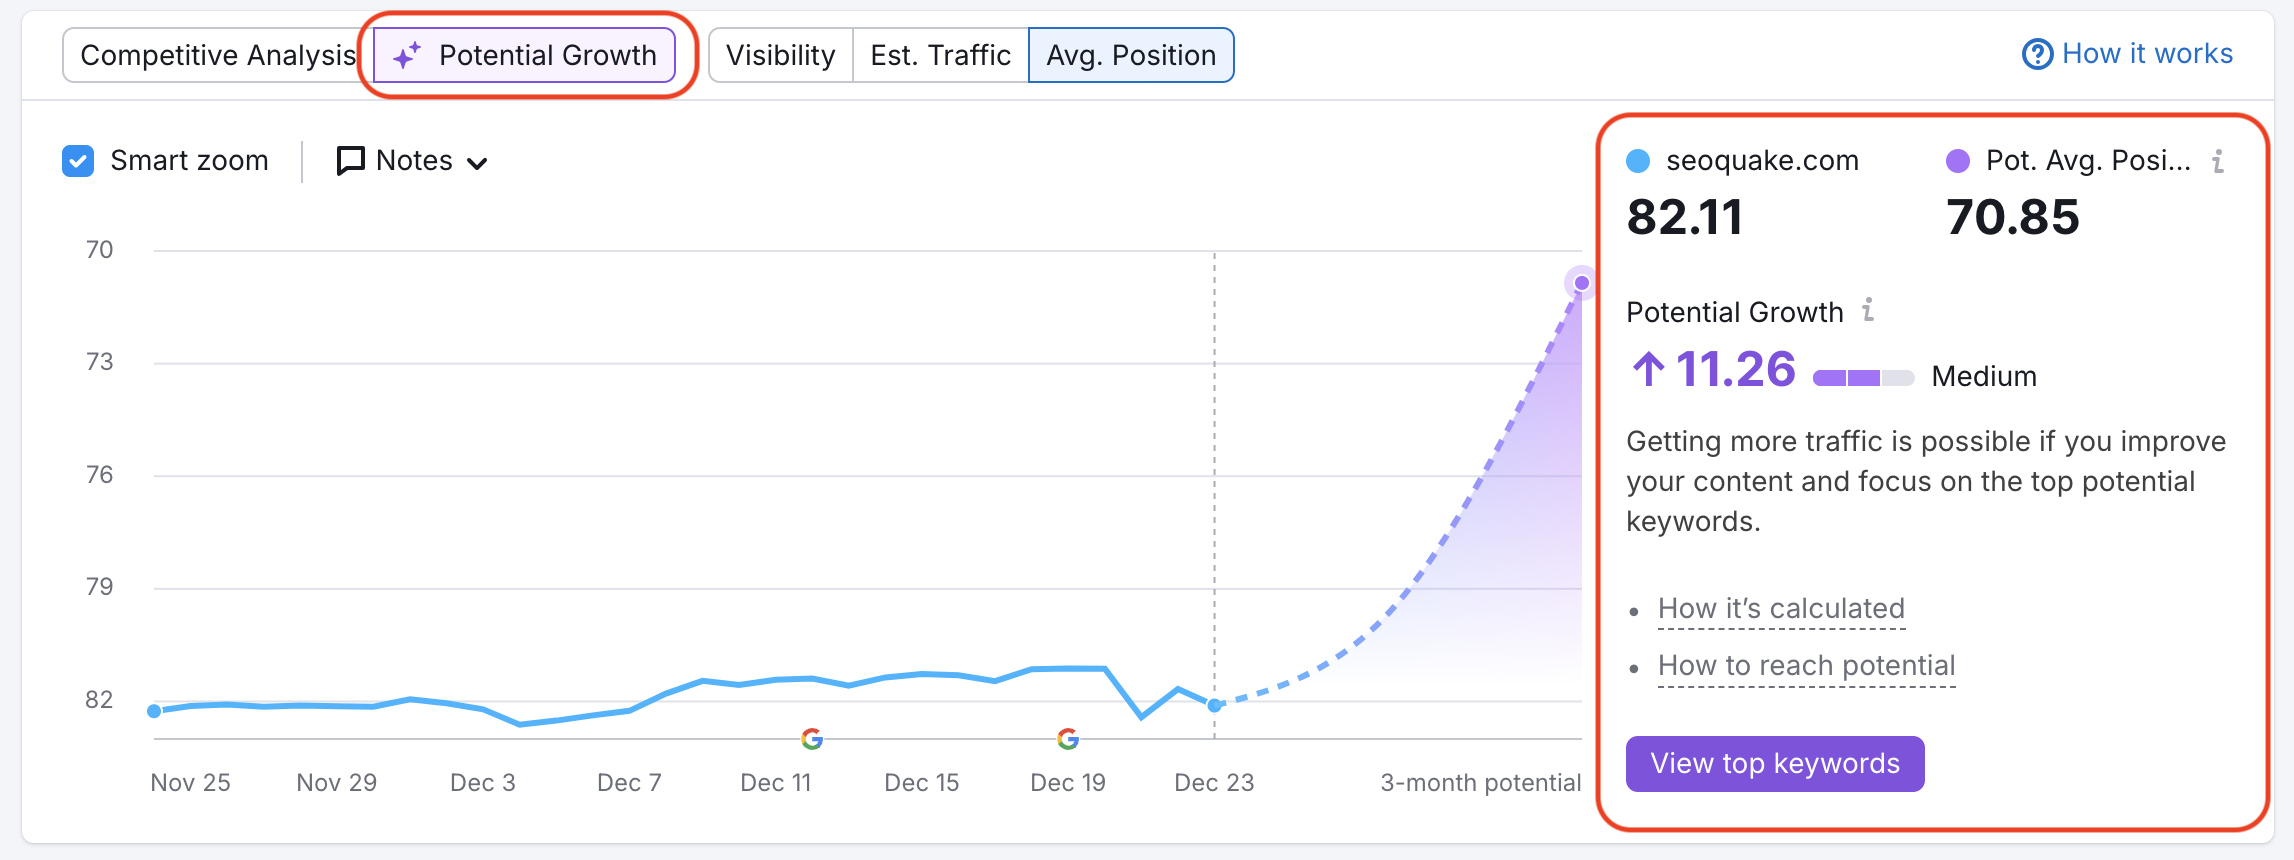
If you switch to the Potential Growth tab within the graph, you’ll see your predicted growth in terms of Visibility %, Estimated Traffic, and Average Position. Learn more about Potential Traffic here or use the tooltips in the Potential Growth report to get the general information on this metric.
Share of Voice
With a Business-tier SEO toolkit subscription, you can also track Share of Voice using this graph.
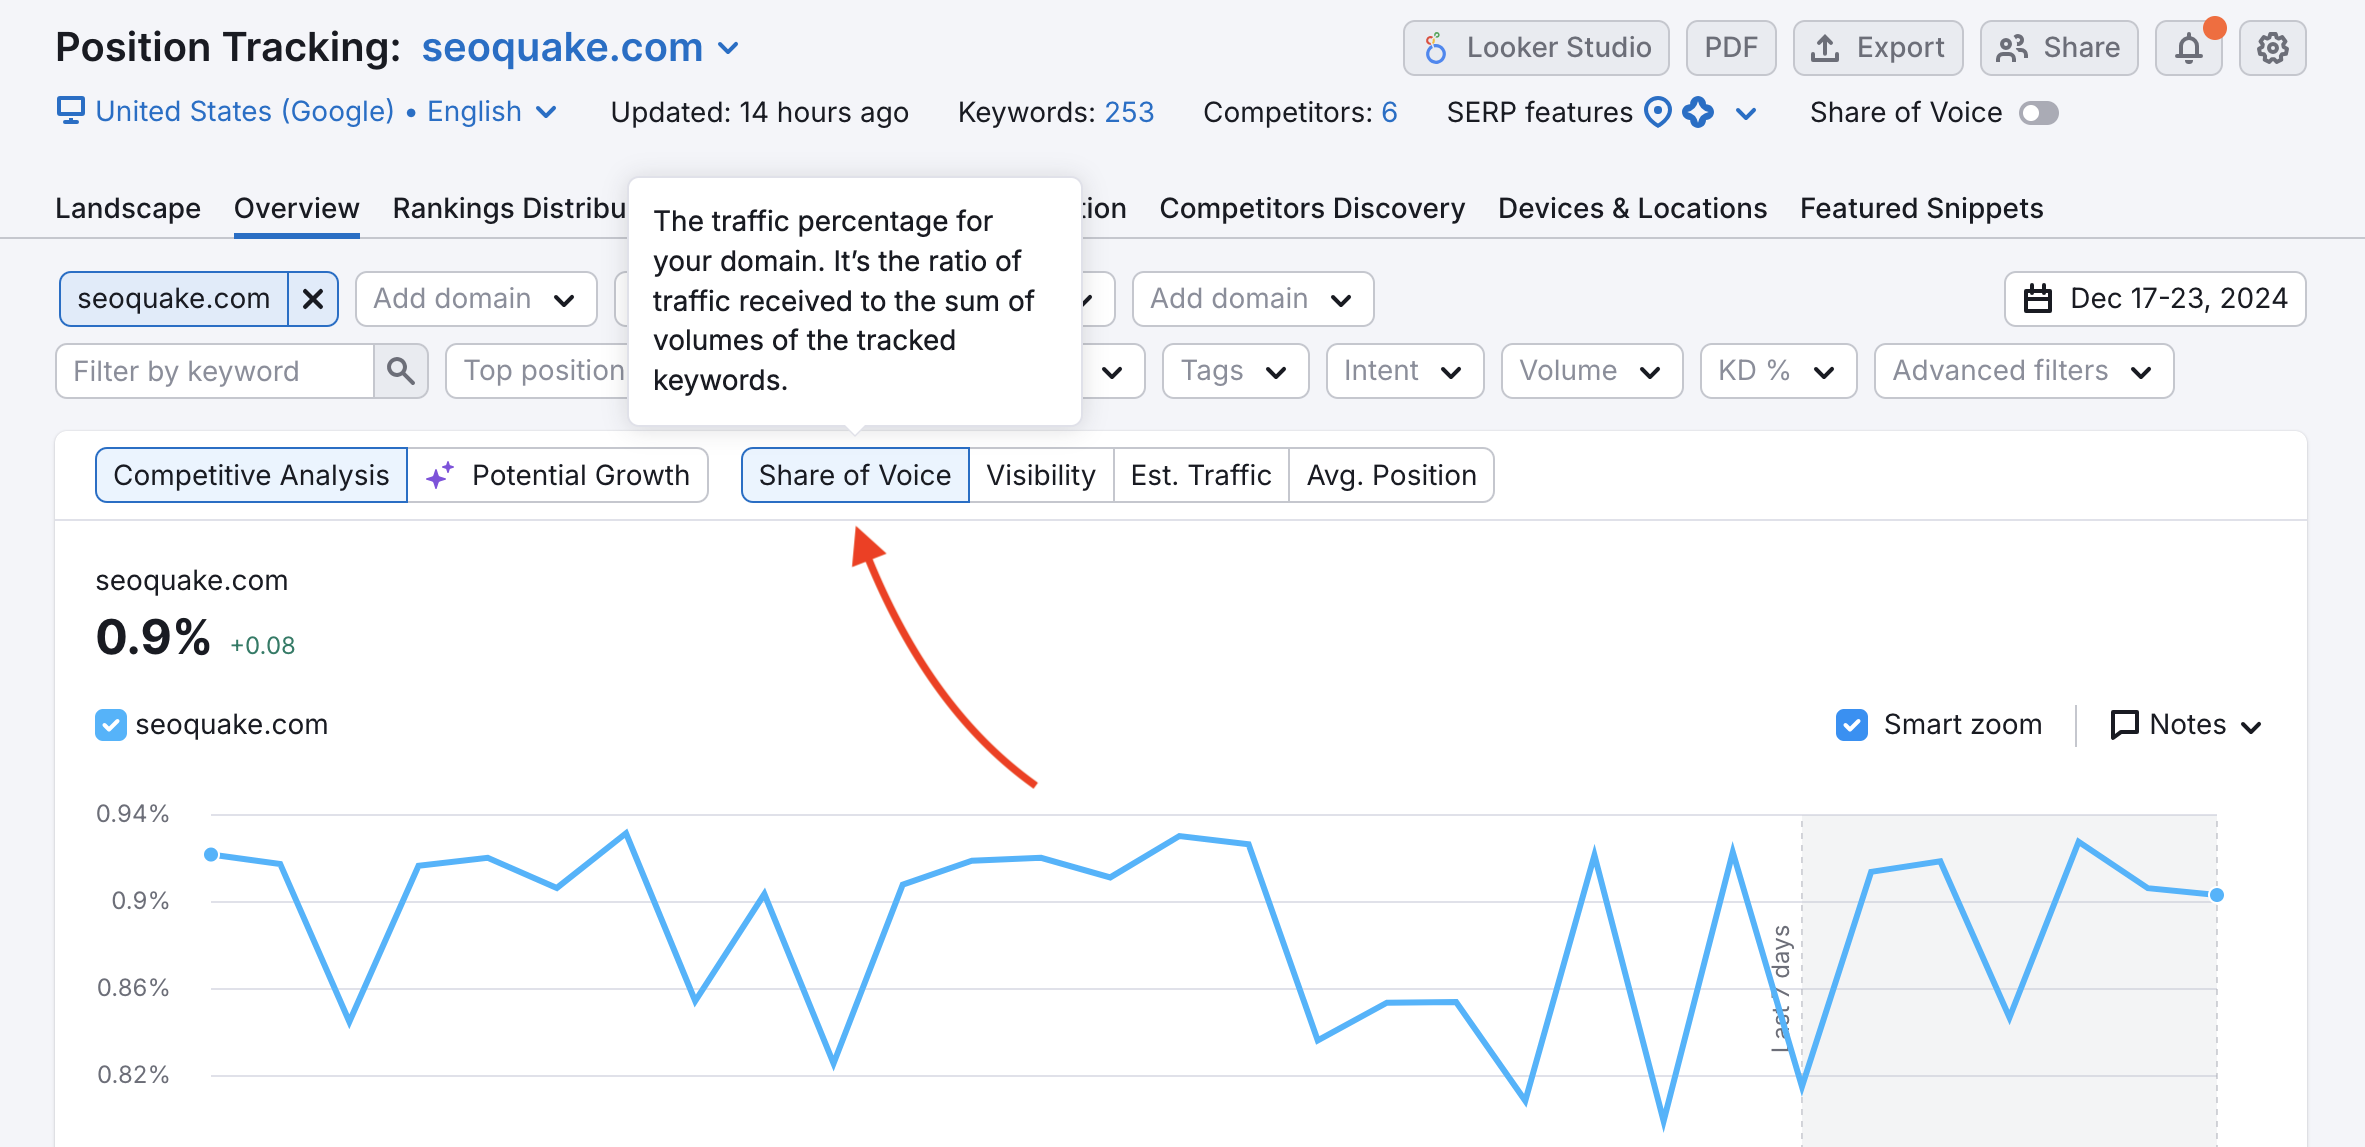
Share of voice goes one step further than the previous three metrics by taking into account the total combined volume of all of your keywords and tells you the ratio of traffic that each site gets.
This metric is weighted more by the actual number of searches and estimated traffic, rather than just by the number of keywords.
Your website’s share of voice represents how often you show up out of every search, not just every keyword.
Here’s an example:
Let’s say you are tracking one keyword with 30,000 monthly searches and ten keywords with 50 monthly searches.
Those 30k monthly searches from that single keyword will factor in much more than all of the less popular keywords combined towards your share of voice.
If you have the top position for all of the small keywords but no ranking for the big keyword, your visibility % would be high (since you’re ranking well for a lot of the keywords in your campaign) but your share of voice would be low (since you’re missing out on those 30,000 monthly searches).
This is because your visibility for those small keywords equals about 500 total searches per month, while the one big keyword counts for 30,000.
Notes
This feature lets you custom notes to your campaign tracking. You can save notes about site maintenance, when you started or stopped a new campaign, when you added a new landing page to your site, or on any dates where you added more keywords to your Position Tracking campaign. By saving relevant notes, you can correlate any spikes in visibility, traffic, or position to your activity.
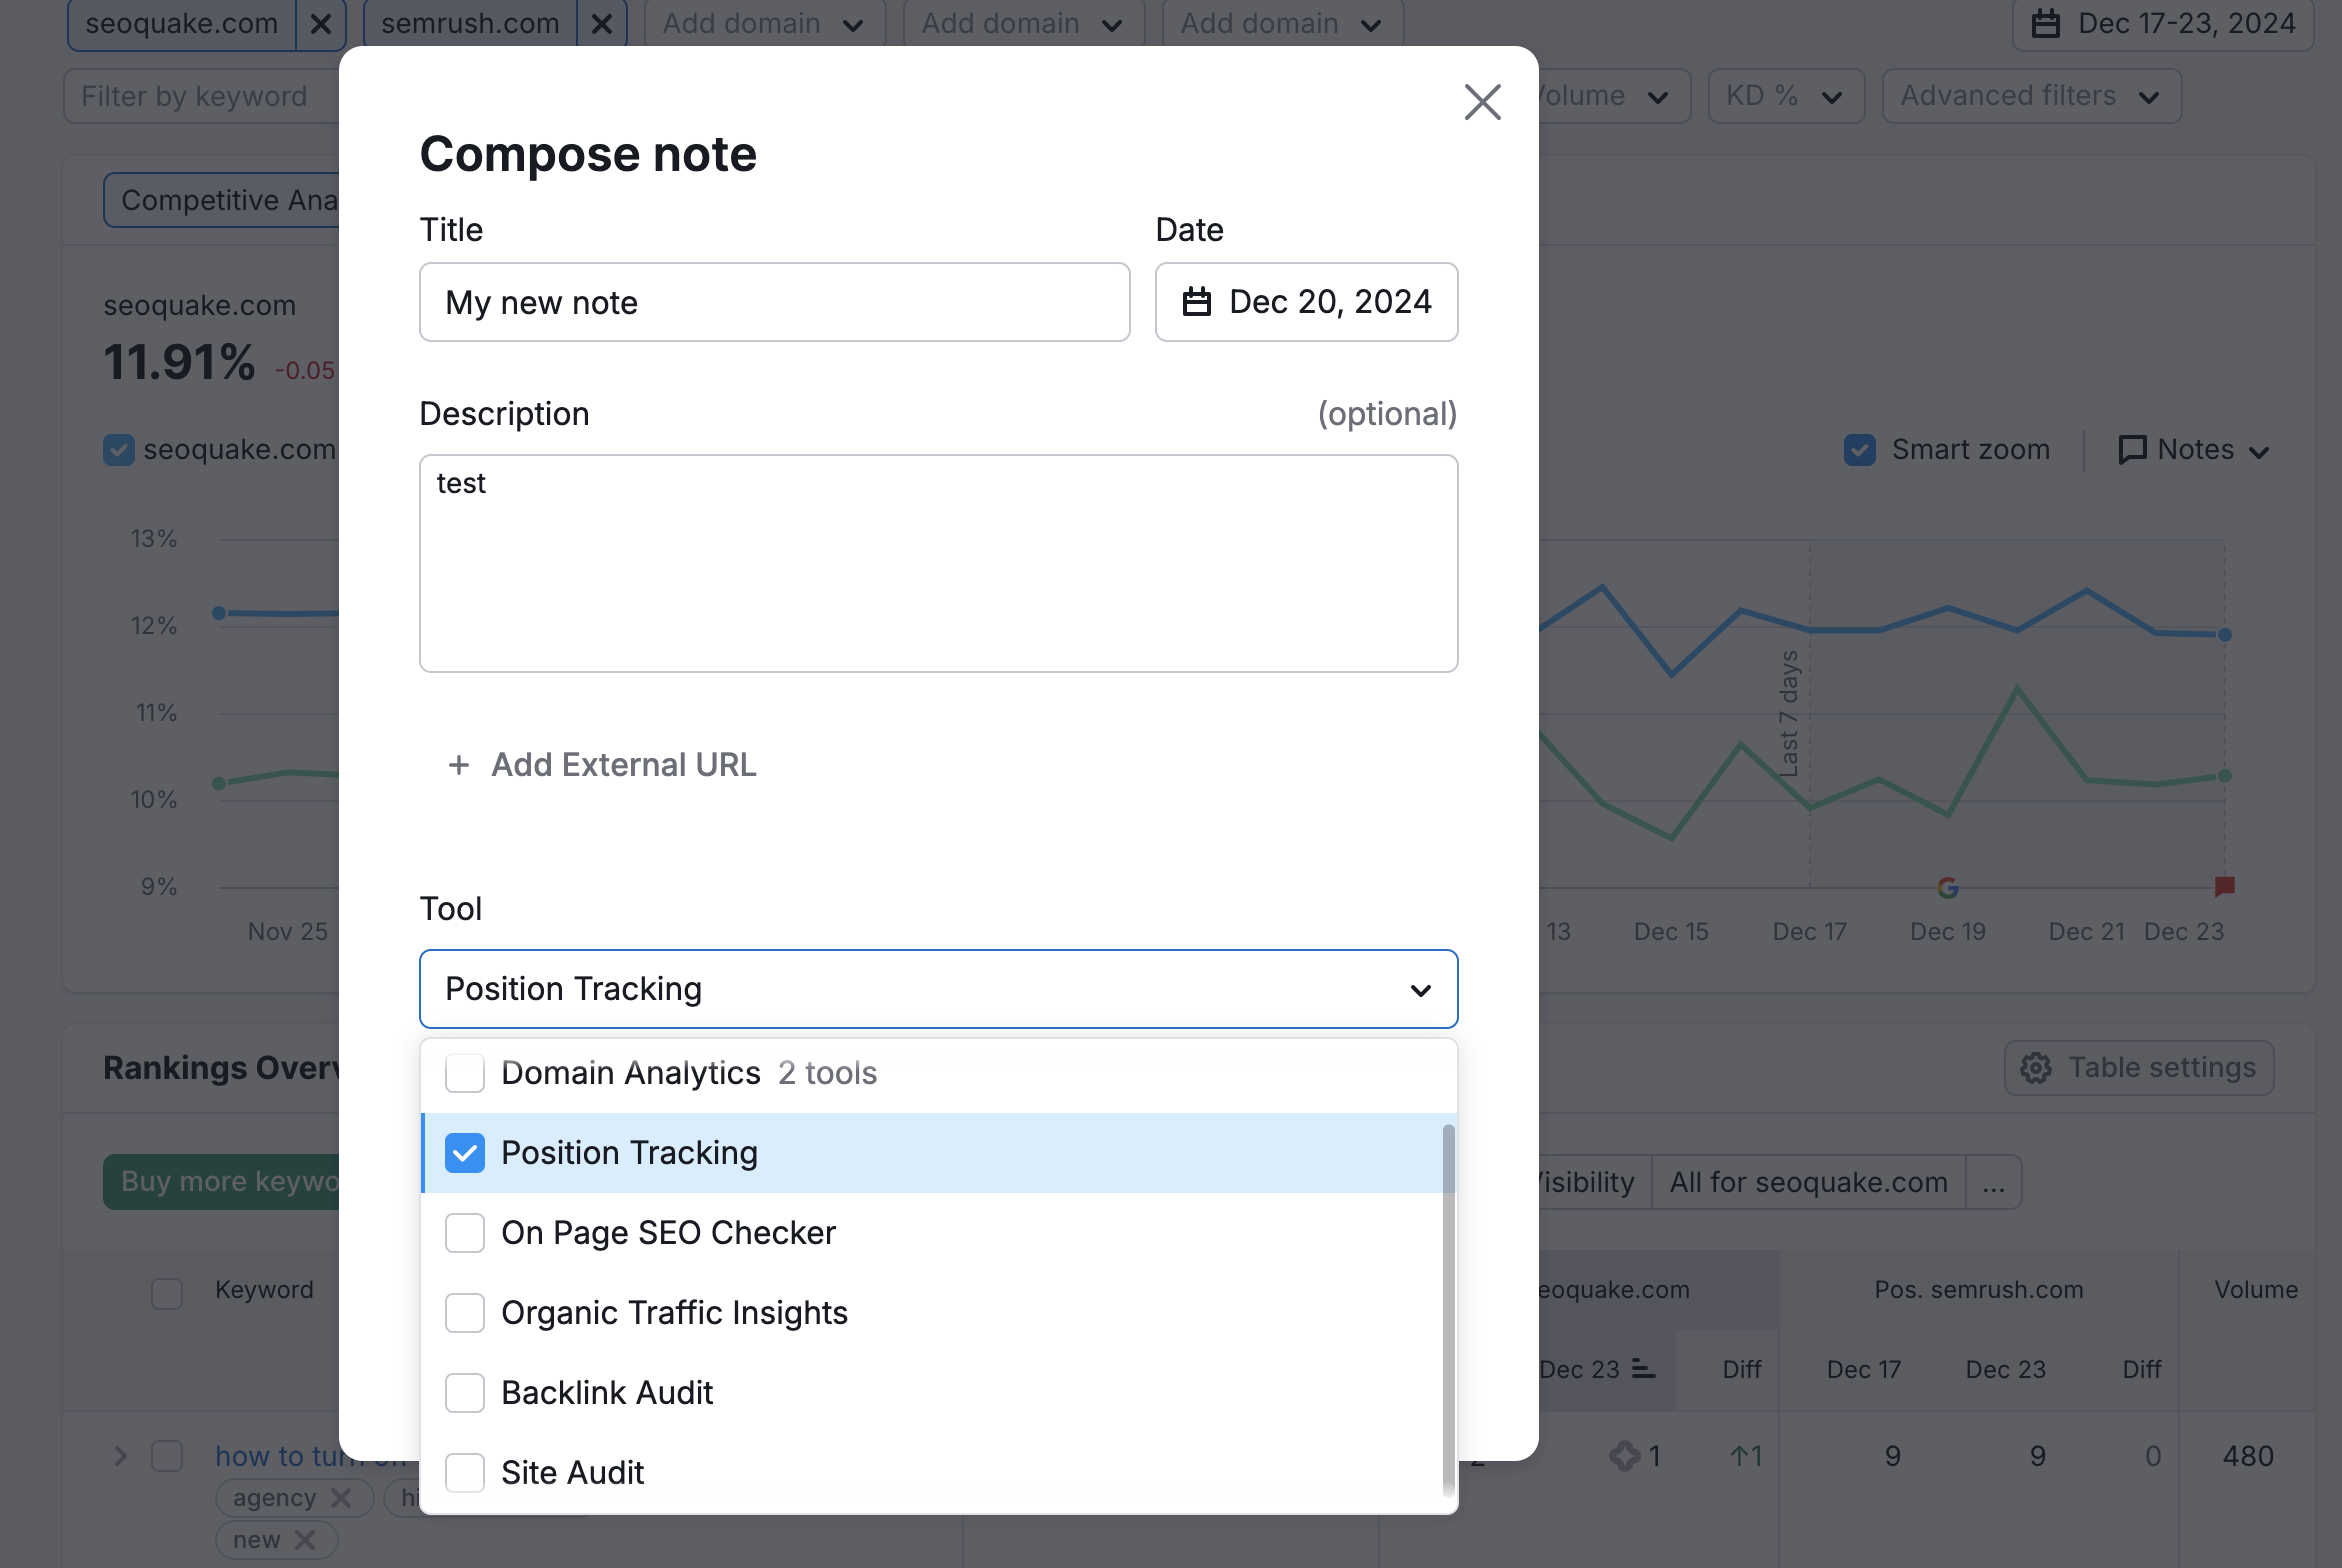
Just click "Add" and enter the details and date on the pop-up window. The Advanced Setting in this window lets you add the note to any of your other tools, to all of your tools, or to your graphs in Domain Analytics.
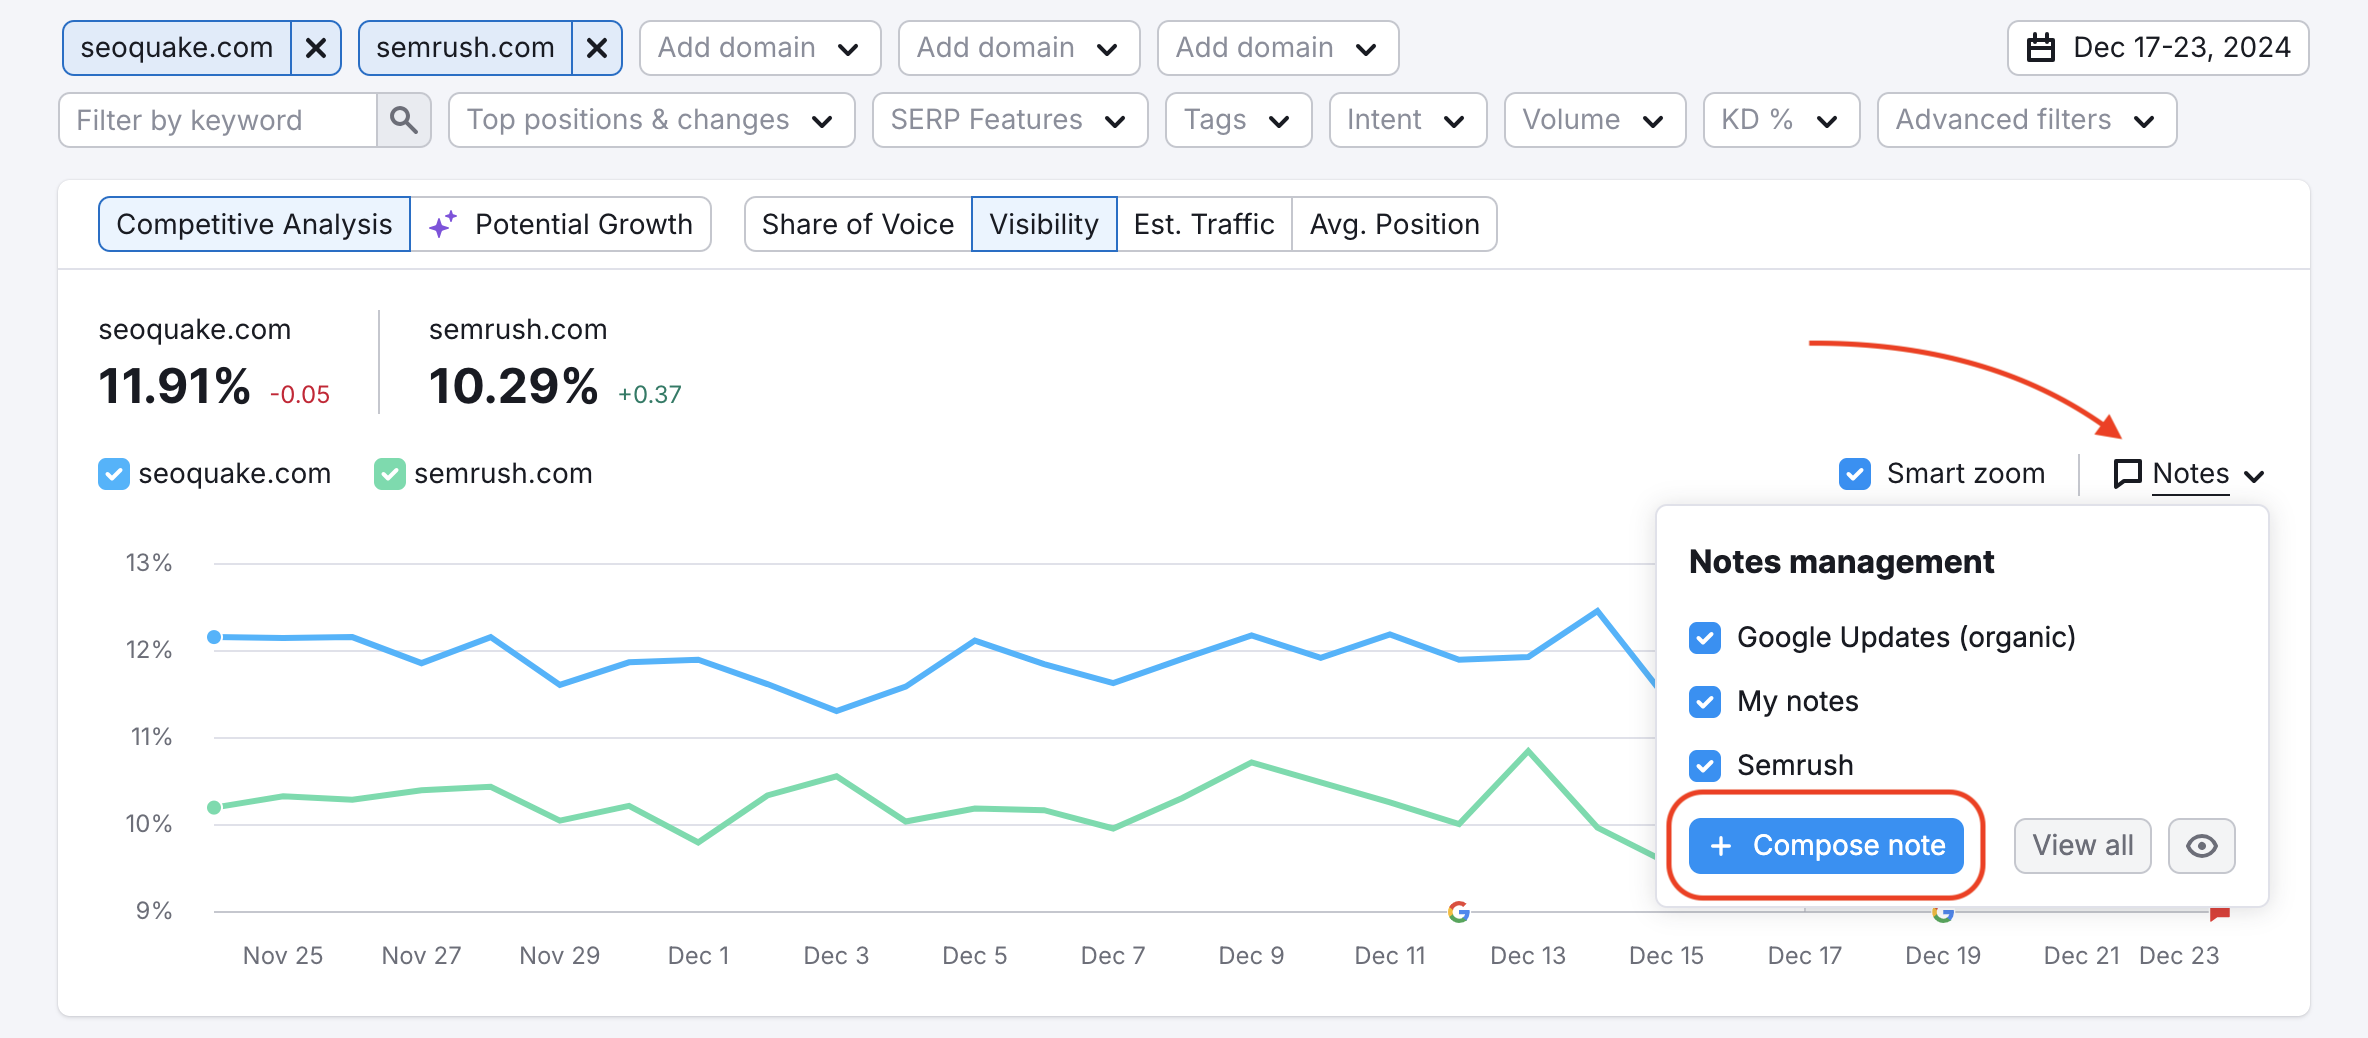
Additionally, when keywords are added or deleted from a campaign, automatic notes will be added to the trend graph providing context and helping you understand changes in metrics.
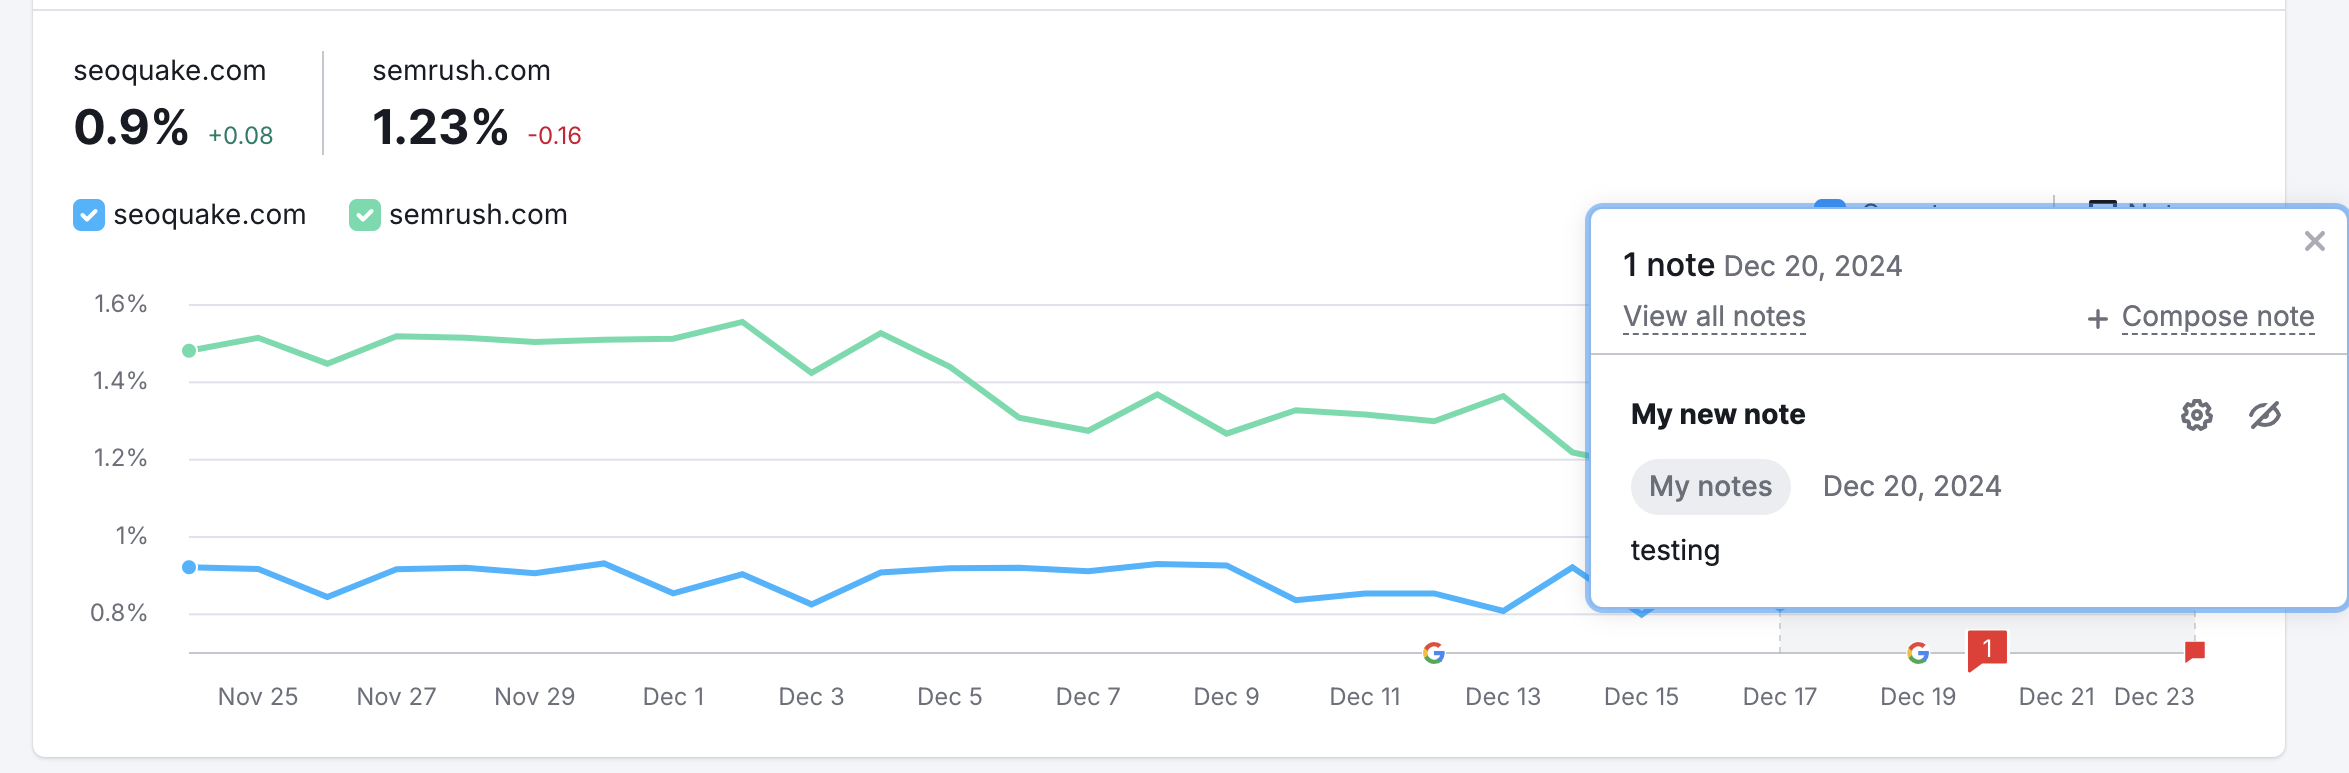
You can also "View all notes" to see all of the notes created by you and the automatic notes added by Semrush in one page. Notes will appear as red notes icons in the trend chart on the Overview report. Turn them on and off with the eye icon above the graph.
Adding Competitors
Competitors can be managed easily in the Overview report. The input fields above the graph allow you to add, change, or remove competitors to your campaign.
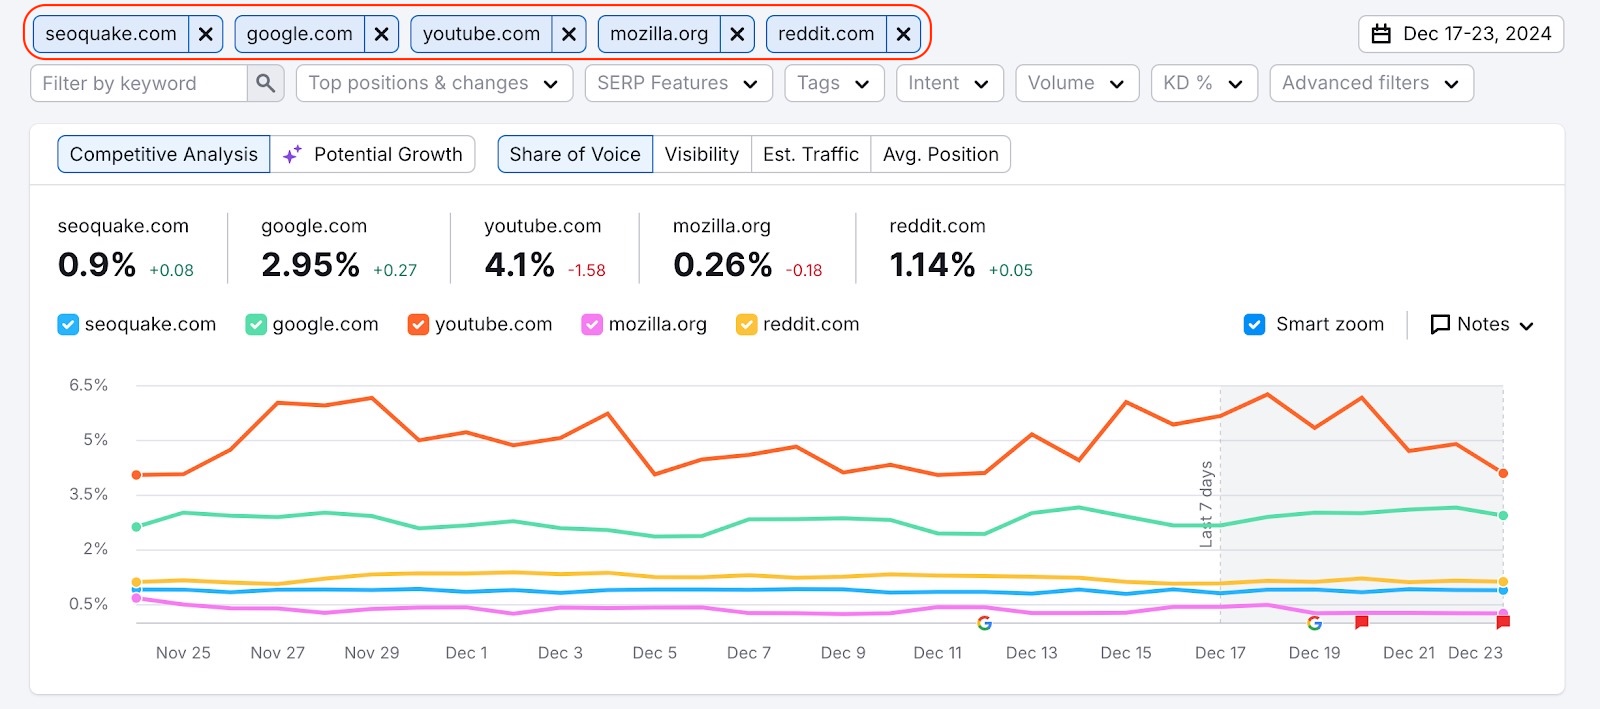
To add a unique domain, subdomain, subfolder, or URL as a competitor, simply type into one of the boxes.
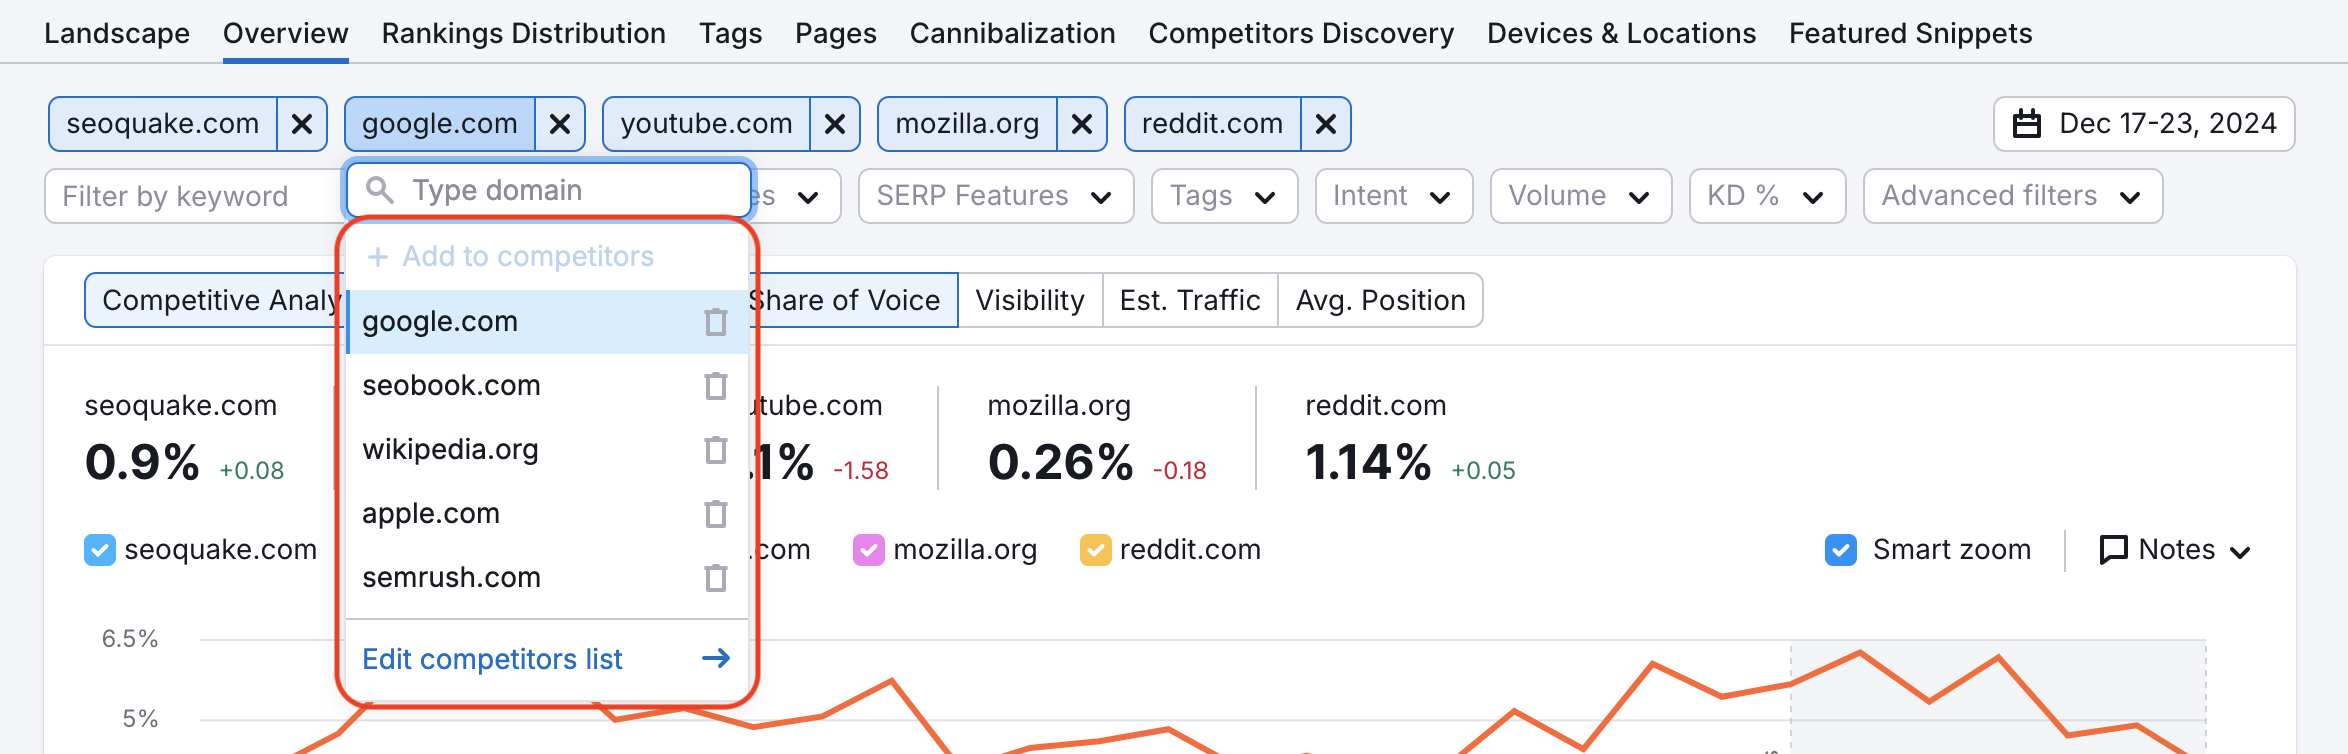
You can attach up to 20 competitor domains to a single Position Tracking campaign. The graph allows you to view performance data for up to 5 domains at a time (including your own).
To manage your competitor list, navigate to the Competitors section at the top of the interface.
- If no competitors have been added yet, you'll see an "Add" button.
- If competitors are already added, this section will display the current number of attached domains.
You can add or remove competitor domains at any time to keep your tracking relevant and up-to-date.

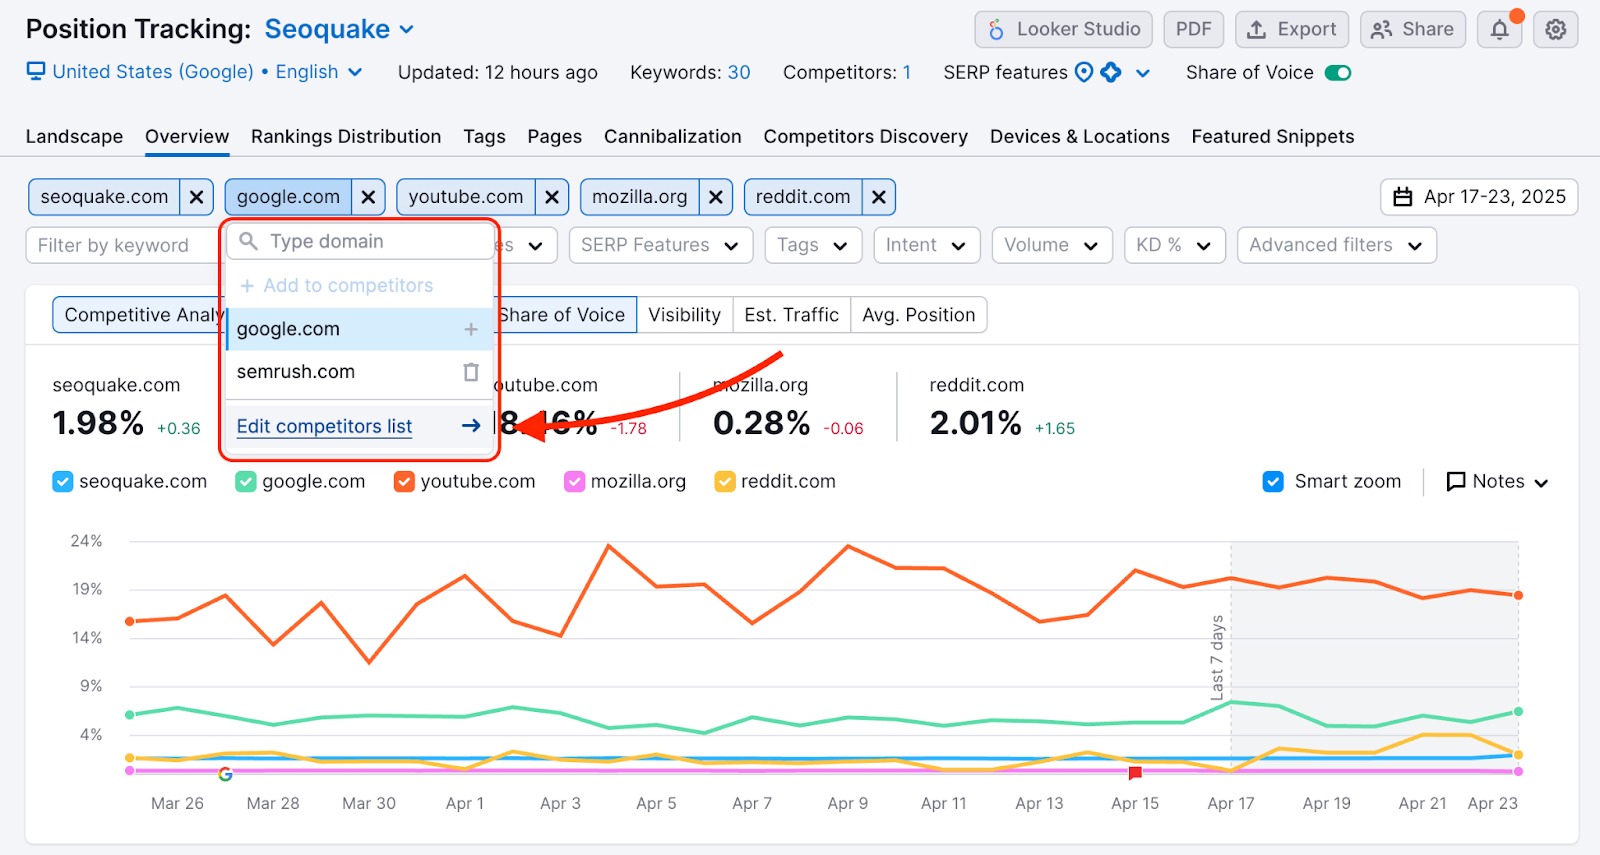
You can also edit your competitor list from the competitor input fields if you select "Edit competitor list." This will open the competitors window, allowing you to update the competitors in your campaign.
For more ways to manage your competitors in this tool, use the Competitors Discovery report.
Rankings Overview
Below the graph will be the Rankings Overview. This is where you can compare rankings between you and your competitors. You can also manage your keywords from this table. There will be a column for each competitor, and a row for every keyword in the campaign.
Positions, Estimated Traffic, Visibility, All
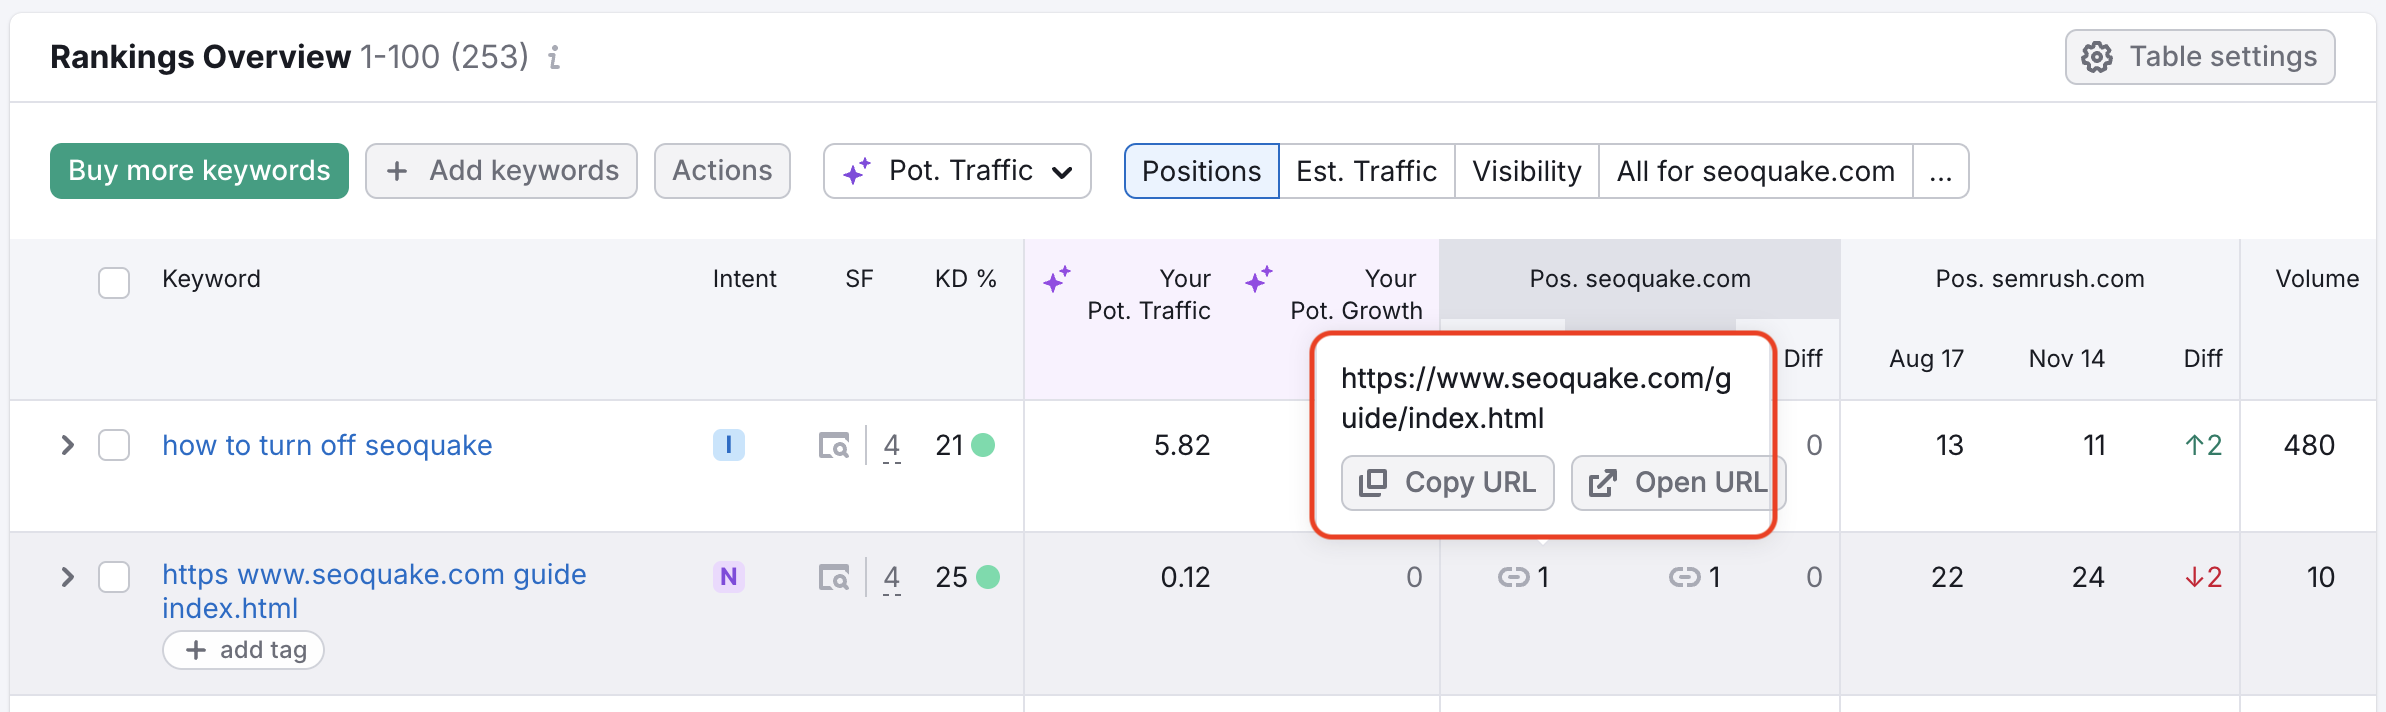
Position Tracking offers three main metrics to measure progress: Positions, Estimated Traffic, and Visibility. Above the table, you have the option to view one or all of these metrics in the table. Whichever metric you select will appear in a column under each competitor. (The image below is showing Positions for each site).
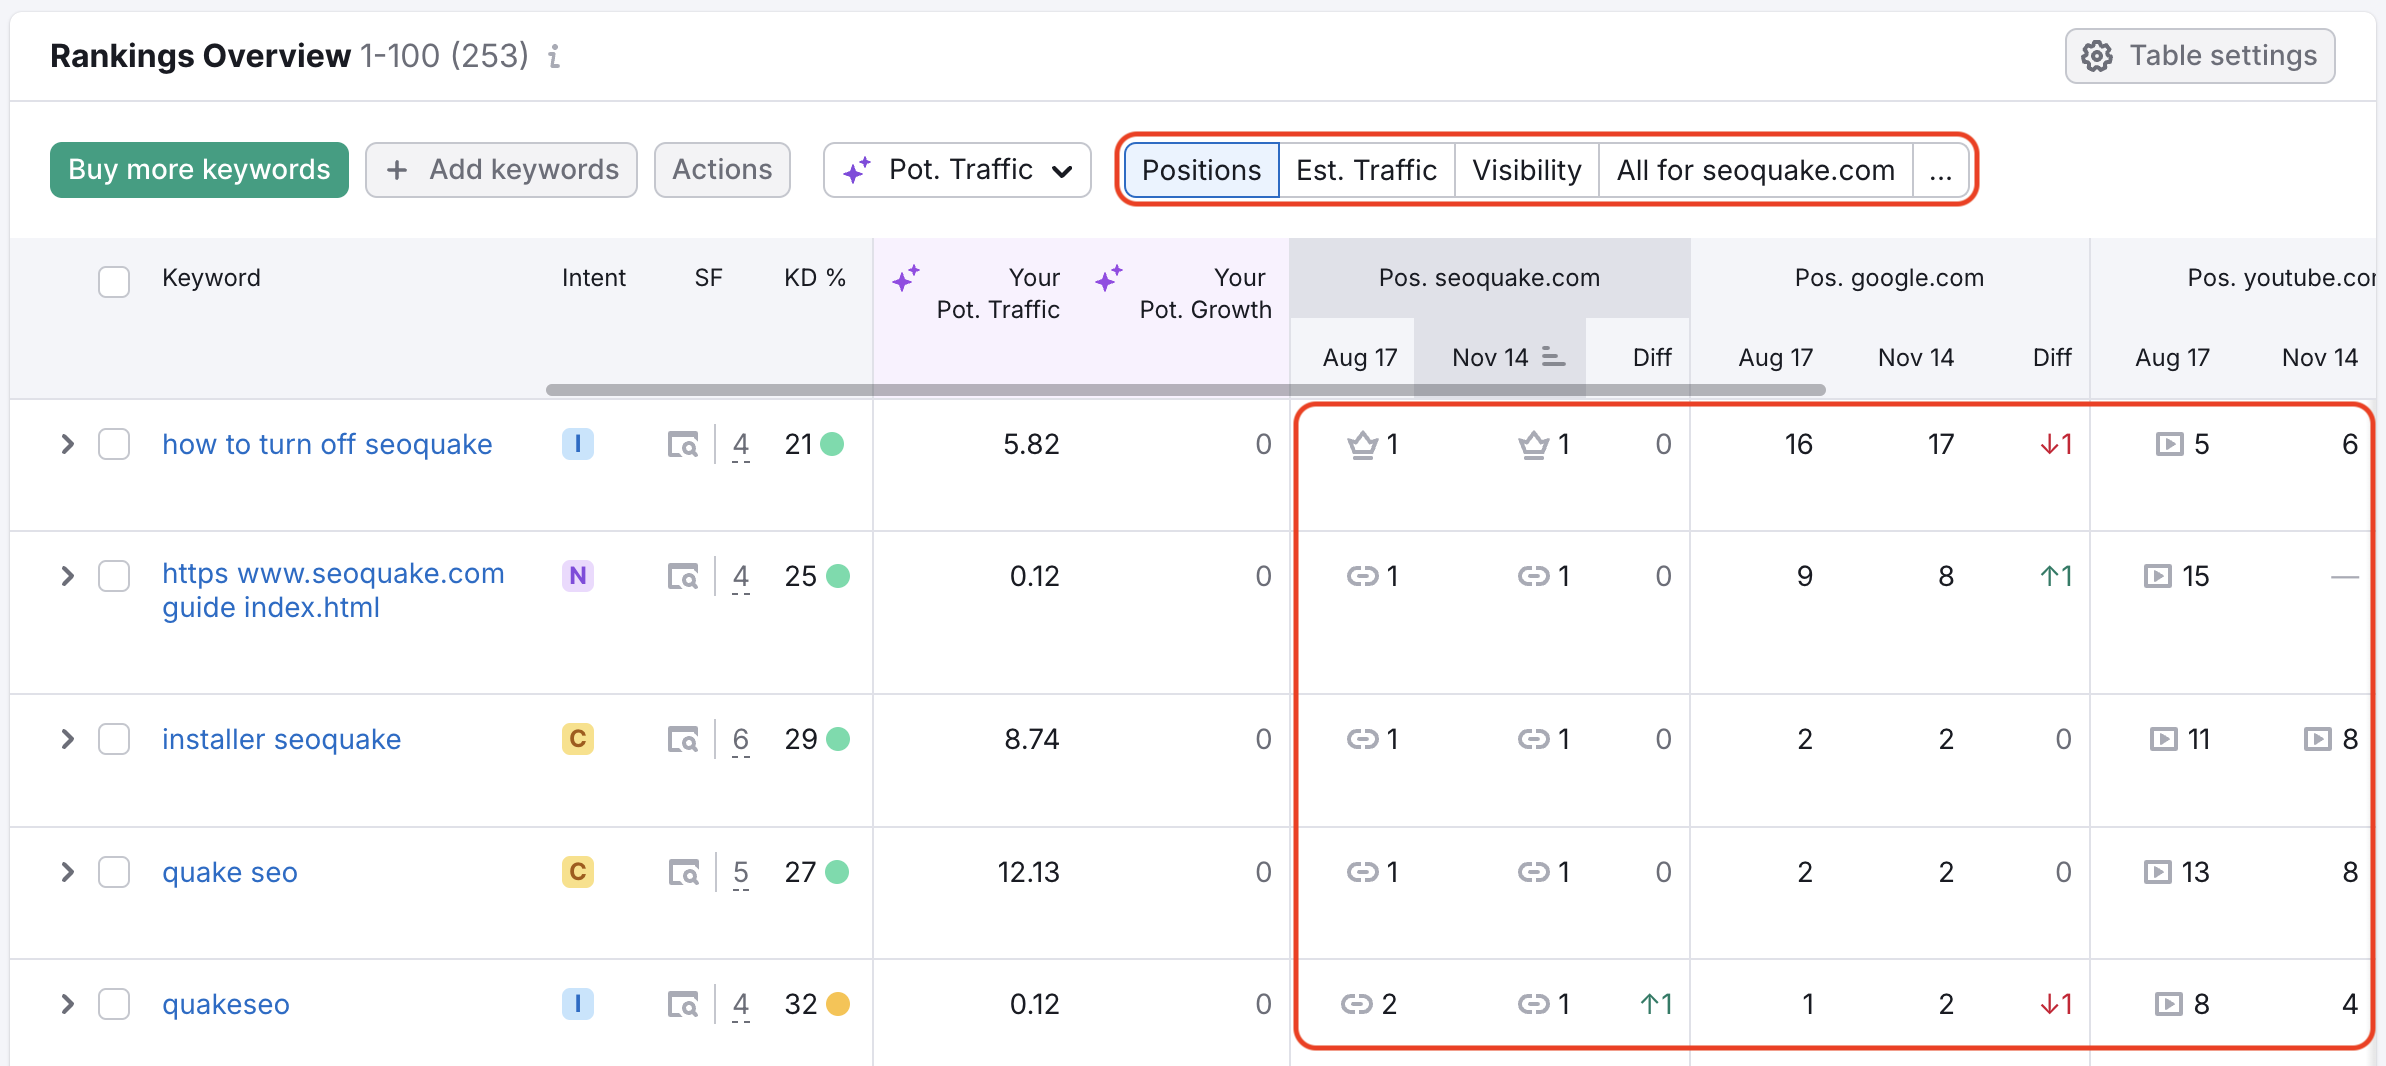
The "…" button lets you look at these metrics for one of your added competitors.
Any of these columns can be sorted from highest to lowest to identify each domain’s strengths and weaknesses. Next to each keyword will be the tags you’ve applied and any SERP Features seen on the results page.
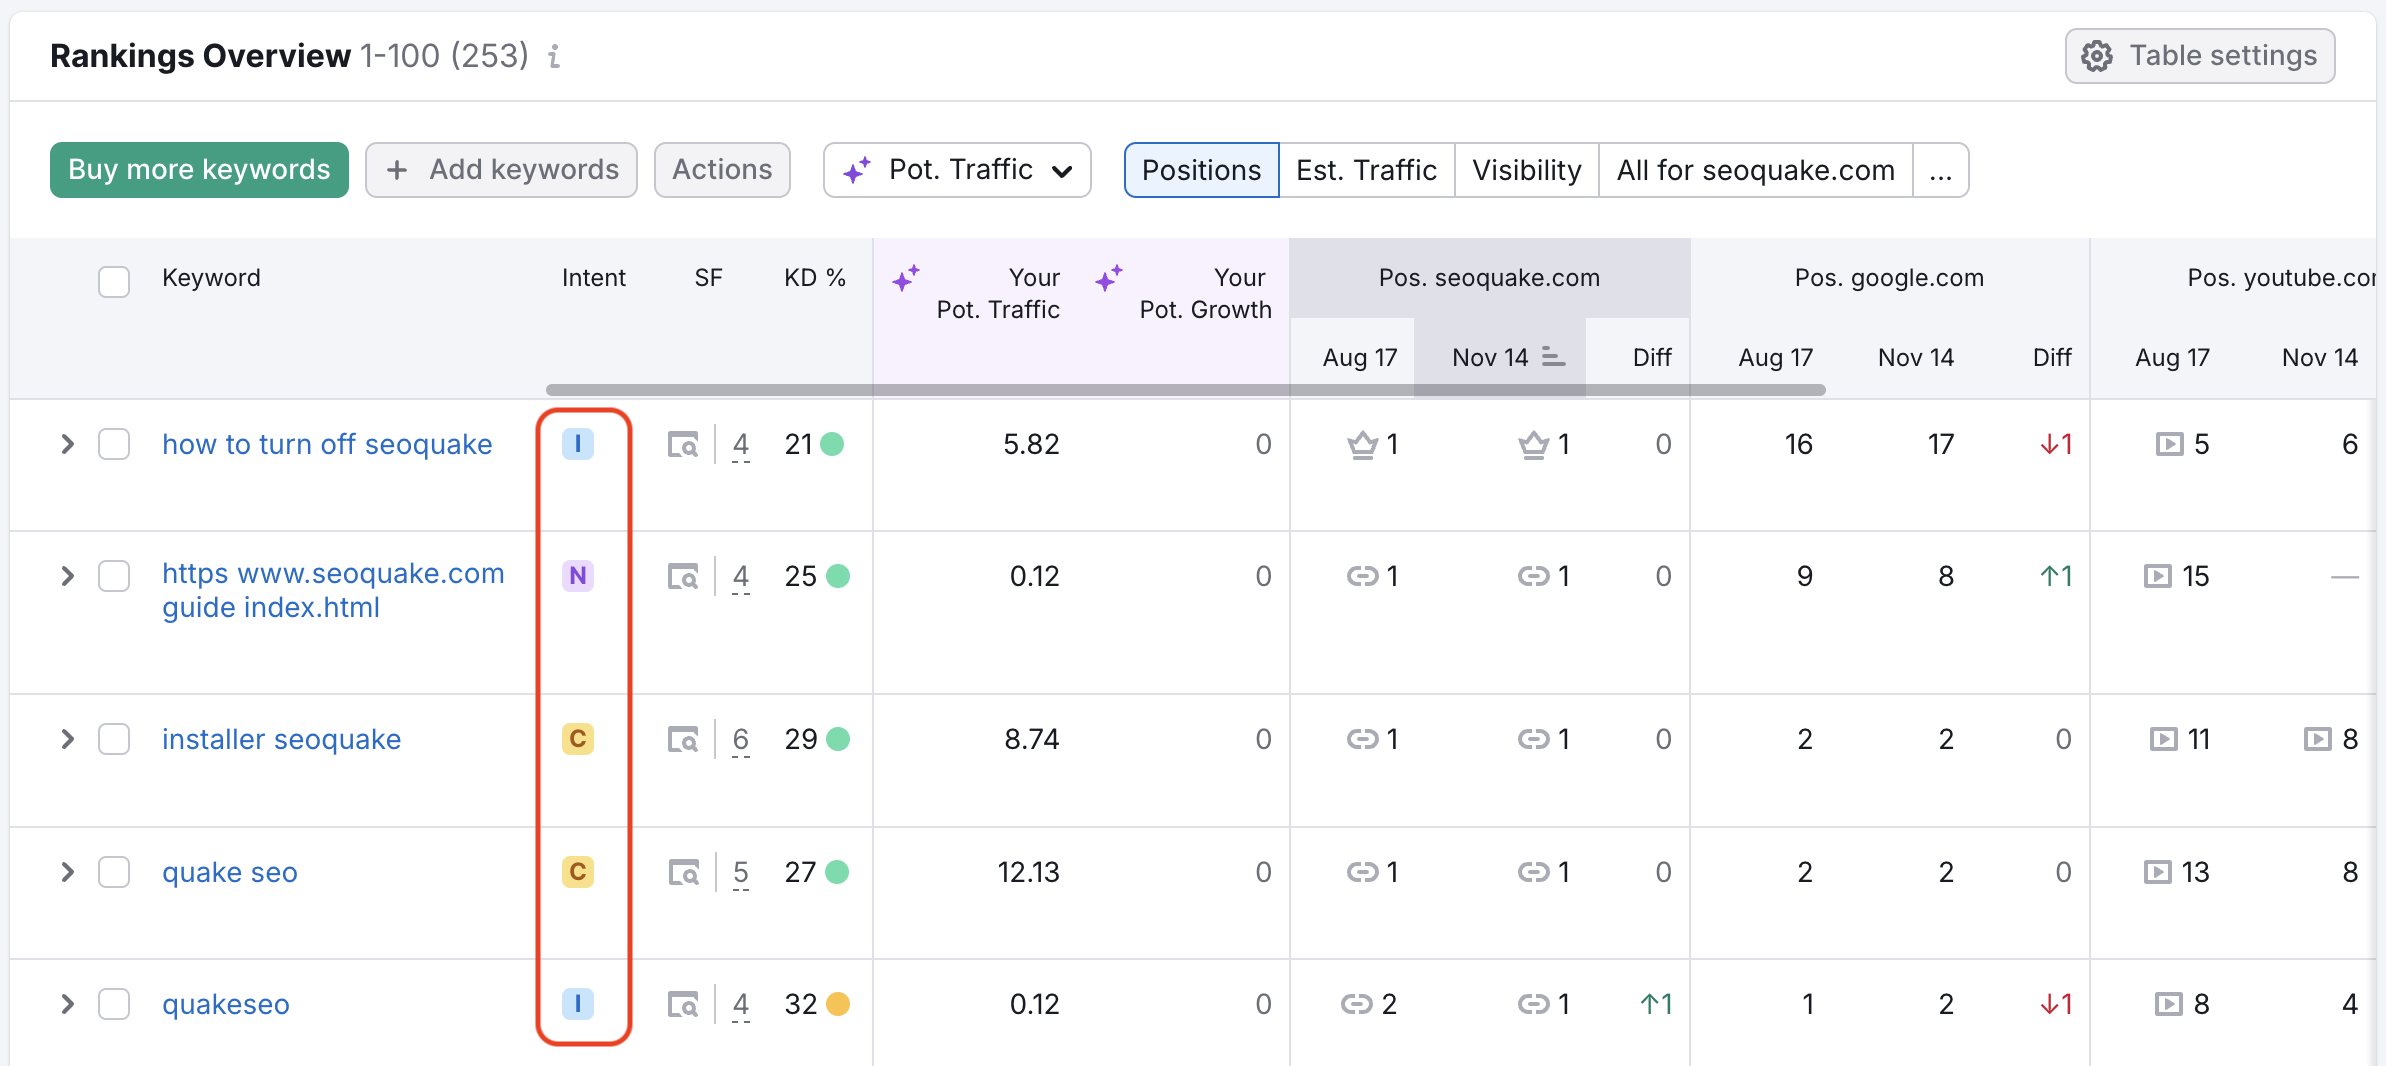
The Intent column automatically displays your audience’s search intent for each keyword in your tracking campaign. Mouse over the intent icon to see the purpose of a user’s query. Make sure that the landings that rank for the analyzed keywords are optimized for the searcher’s objective—intent optimization will bring more relevant and qualified traffic to your website. You can read more about the Keyword Intent on our Blog.
You can filter this table by keyword, top positions & changes, SERP Features, tags, search intent, volume, keyword difficulty and more with the filters above the graph.
You can hover over the keyword’s ranking for any domain’s position to see the full URL.
Note: if your site is occupying a Knowledge Panel, it will be seen as position 11 (unless your page also ranks better than 11 organically), the same as it is in Google Search Console.
Customizing Your Table
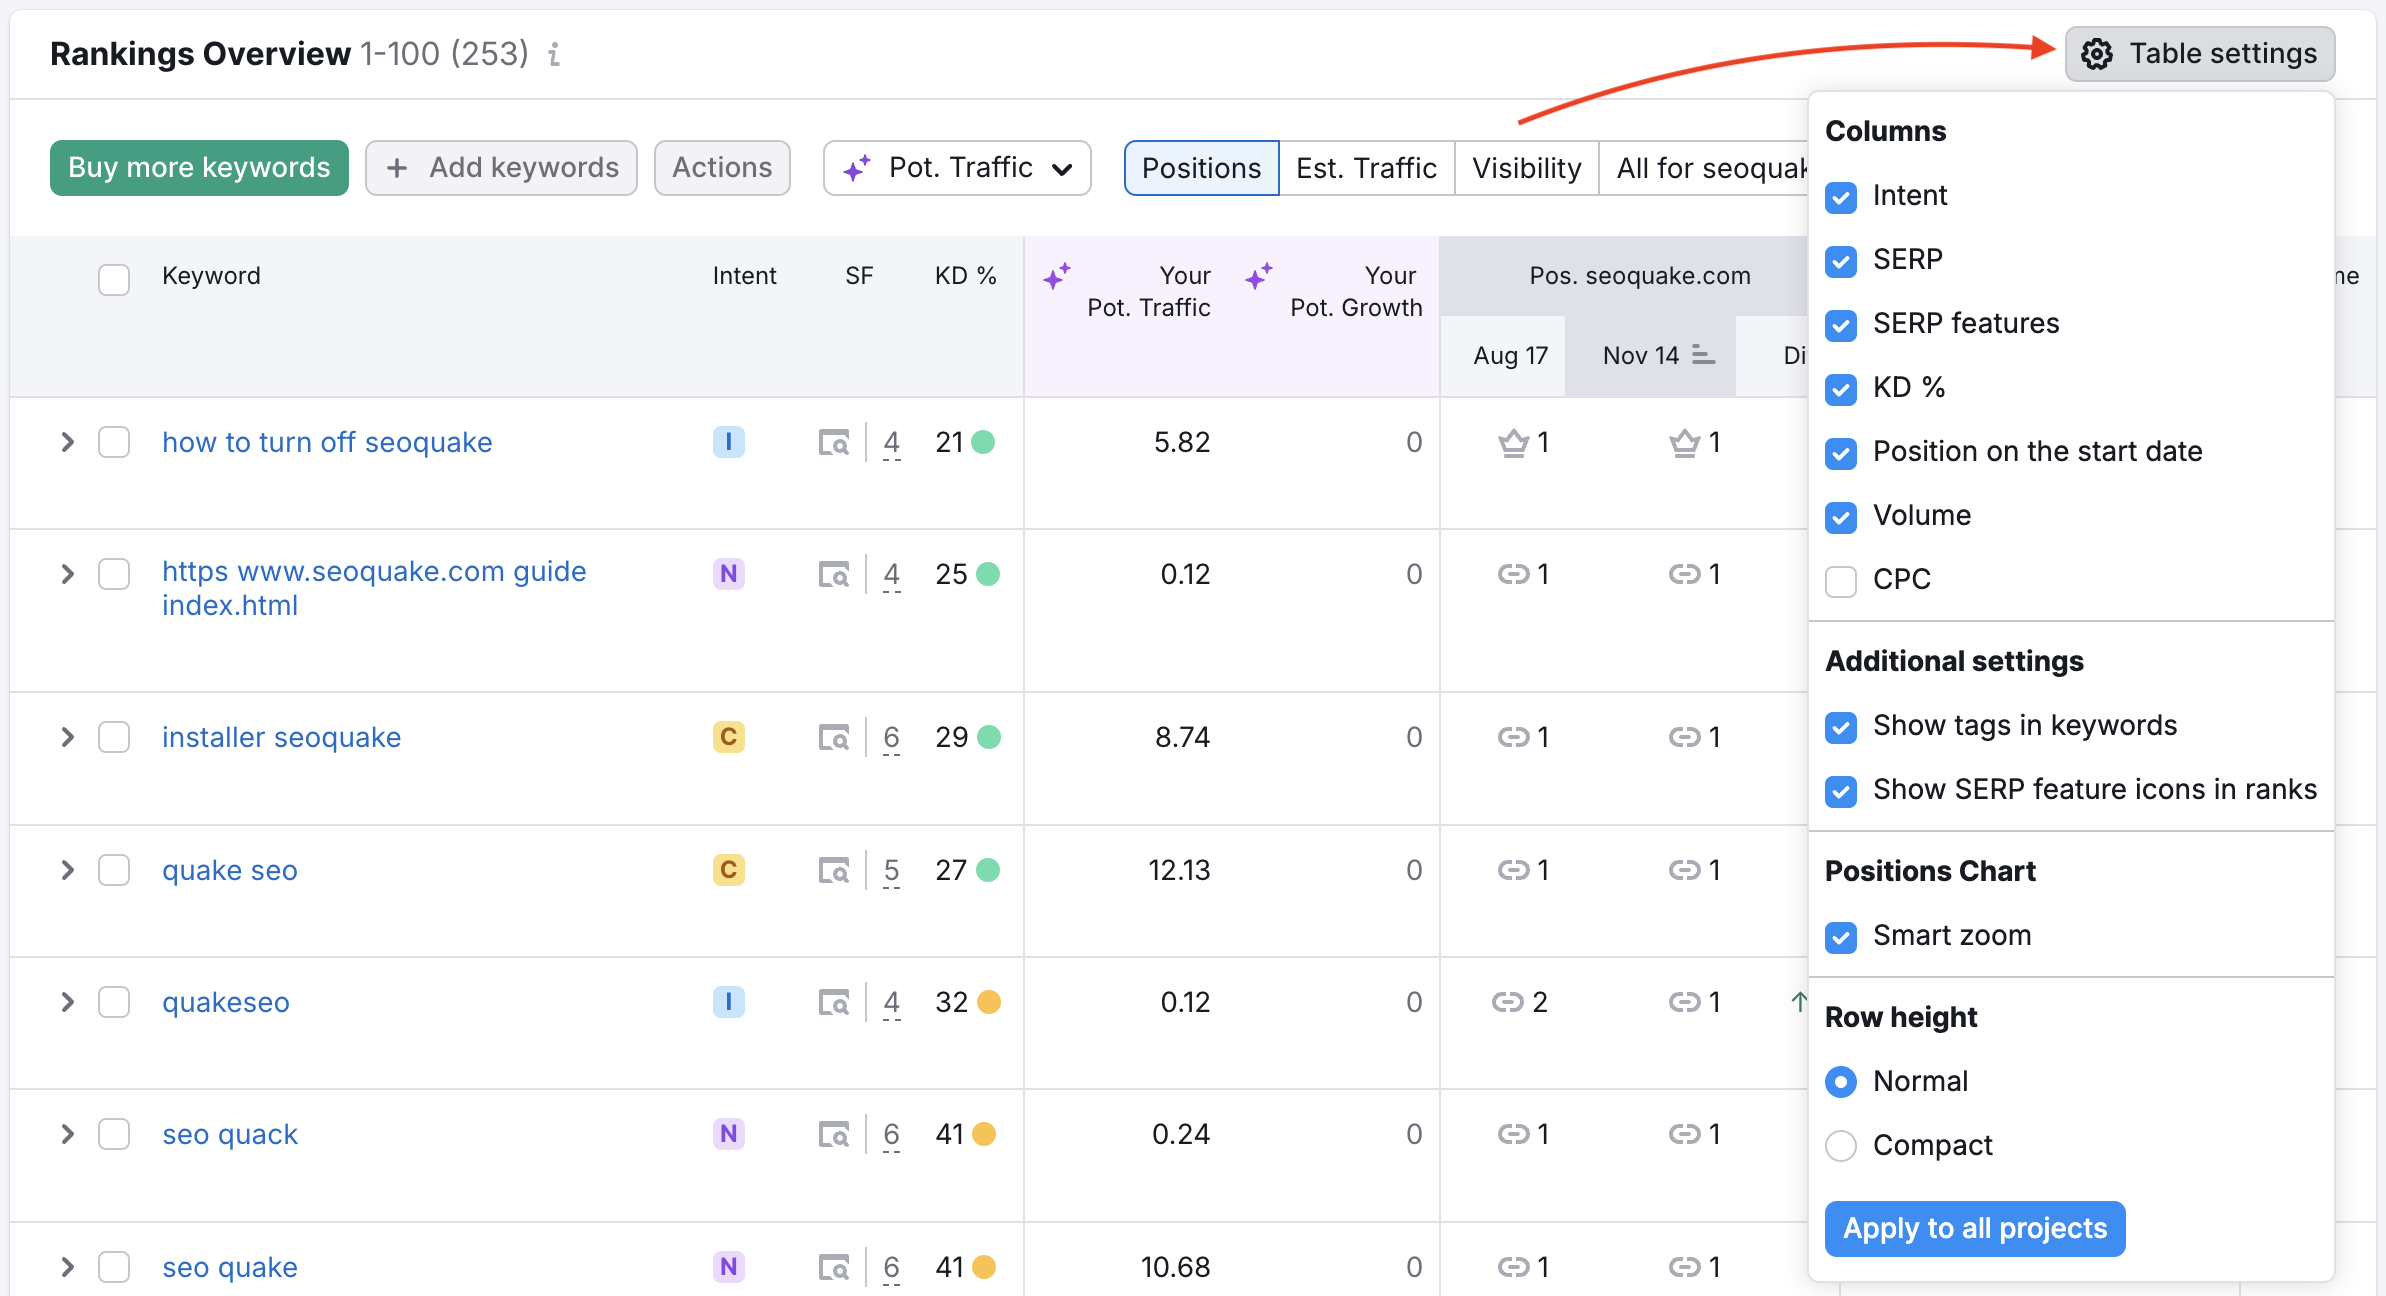
You are able to customize what data is shown within the table by clicking on the table settings in the top right. The table settings are broken into three categories; columns, additional settings, and row height.
Columns let you decide if you want SERP features, CPC or volume displayed within the table. Under additional settings, you can choose to display your SERP feature icons and any tags for your keywords.
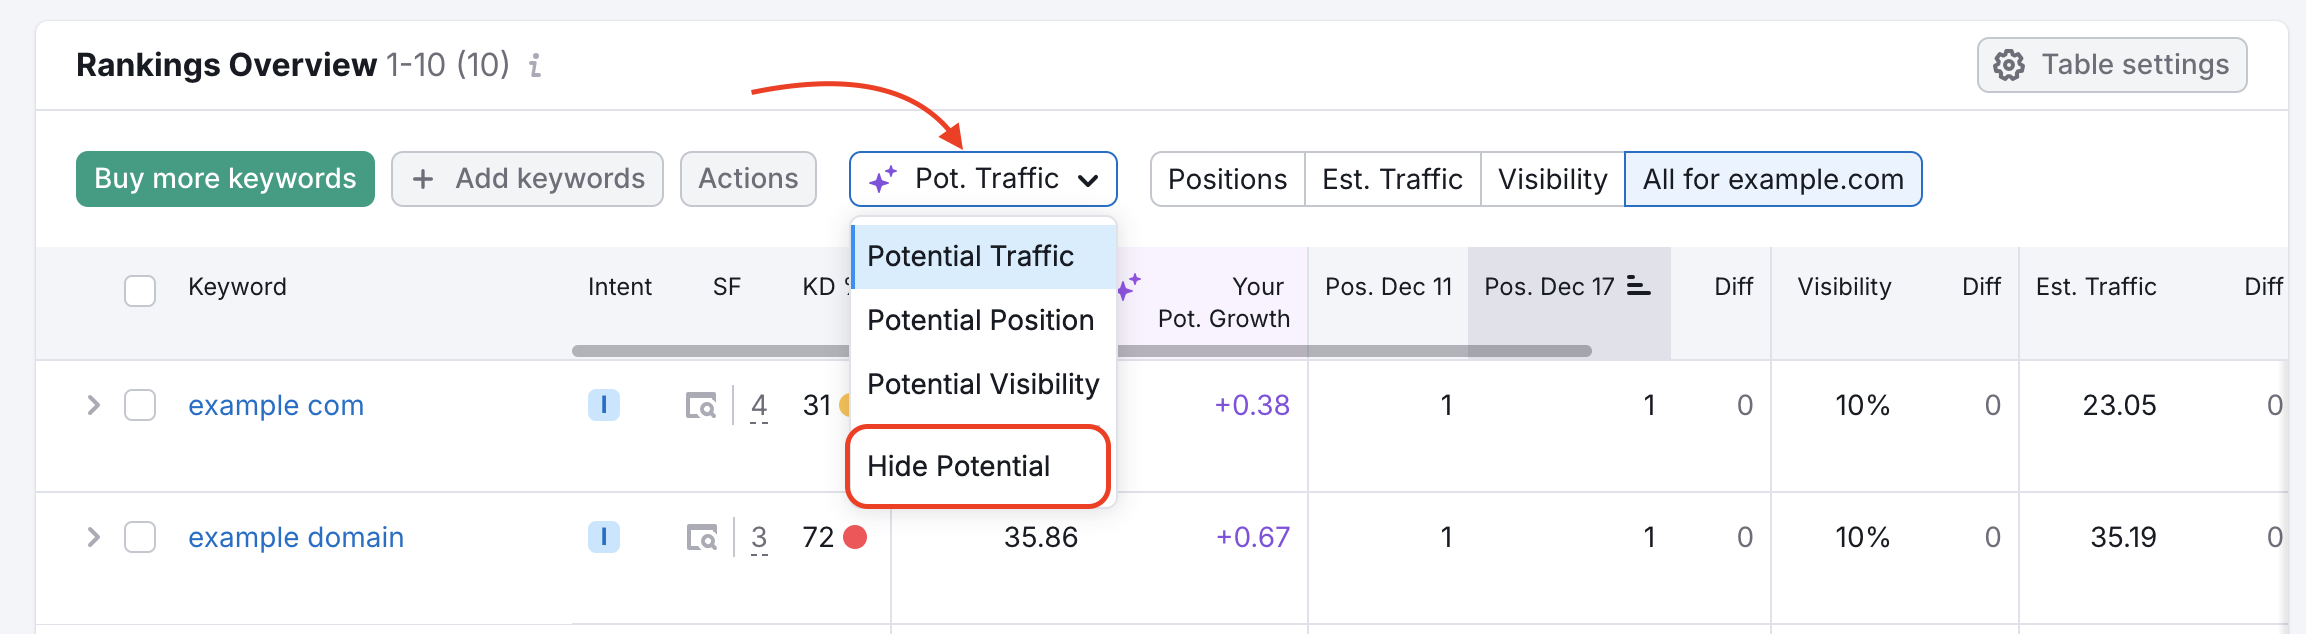
Additionally, you can remove the "Your Potential Traffic" (Your Pot. Traffic) and "Your Potential Growth" (Your Pot. Growth) columns from your table. This can be done by finding the "Pot. Traffic" drop-down menu on top of the Rankings Overview report, opening it and selecting the "Hide Potential" option.
Finally, you can change the display of the table under row height by choosing either a normal view or a compact view.
You can apply these customizations to all of your Position Tracking campaigns by clicking on the "apply to all projects" button at the bottom.
After you decide how you want your table displayed, you can go back to the settings menu and choose which keyword type you want displayed. The dropdown will let you select your organic or paid keywords (Google Ads).
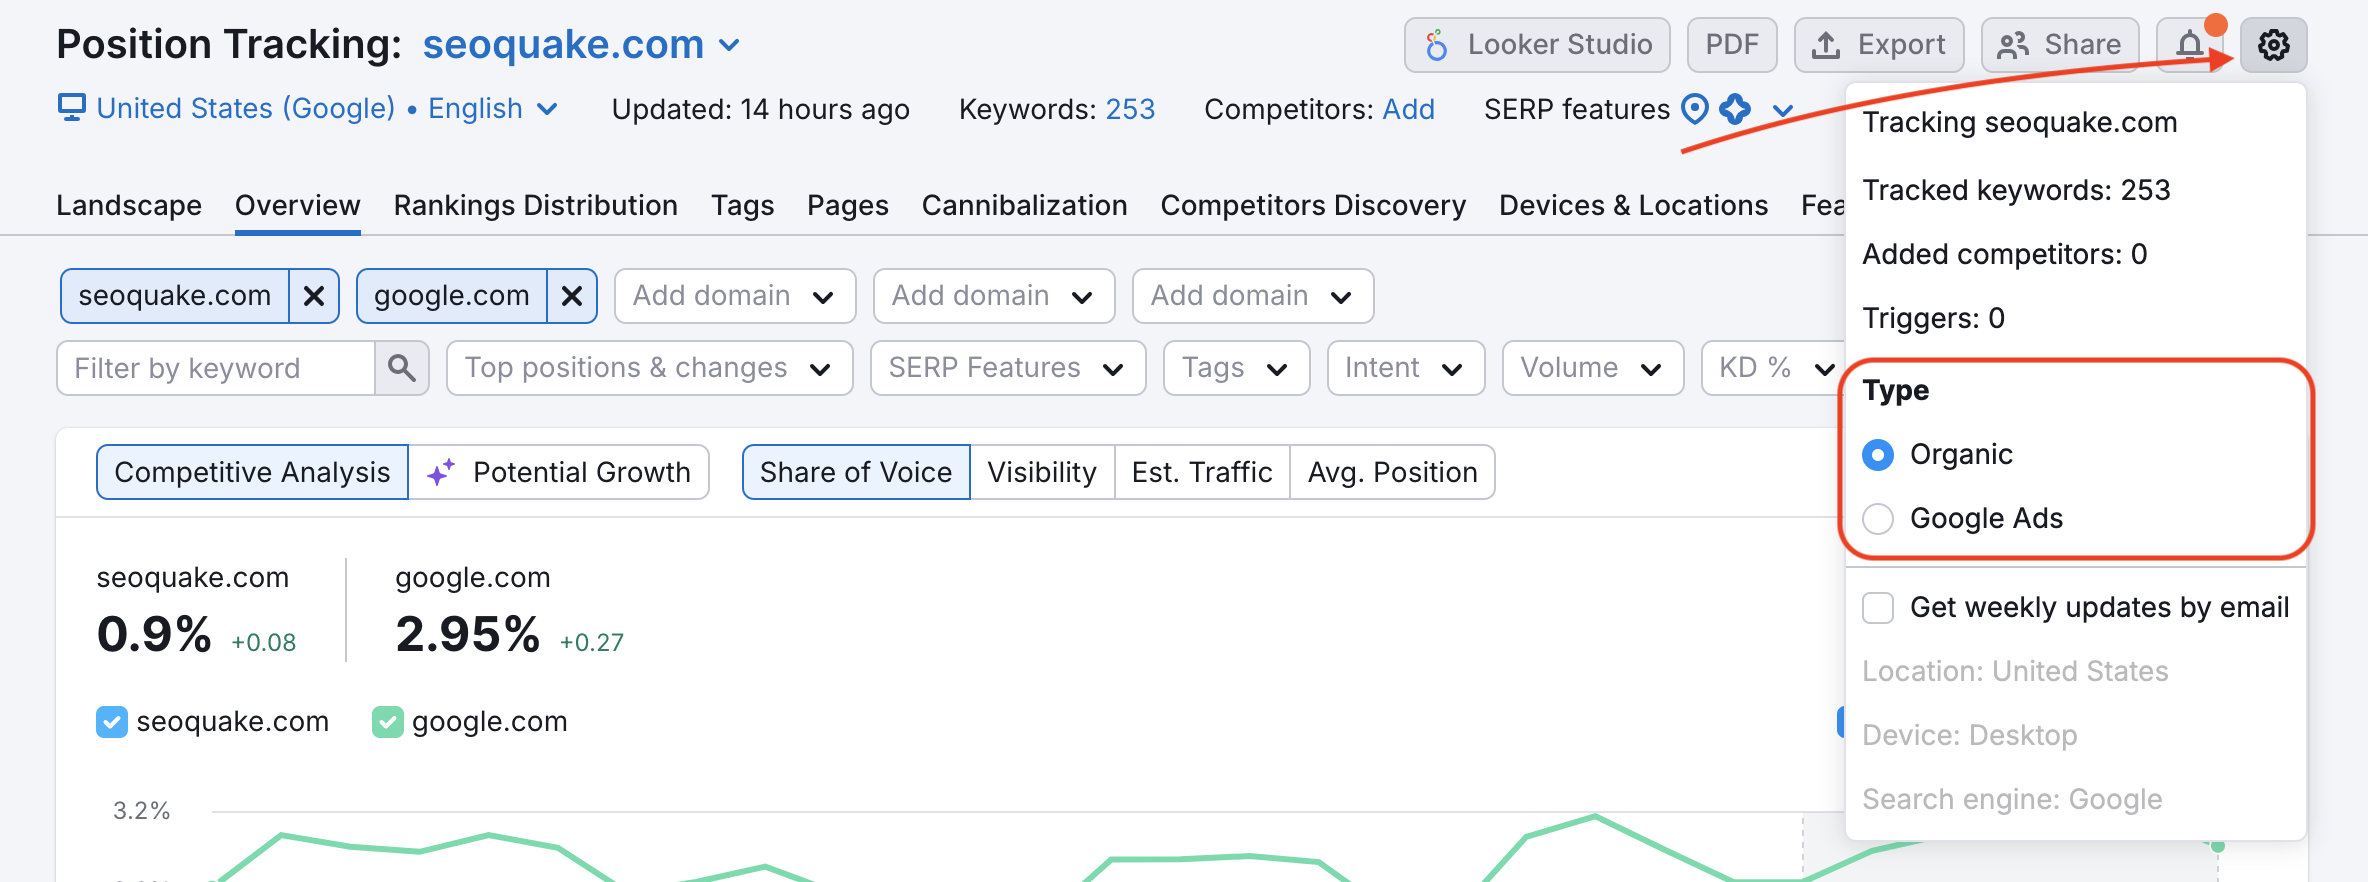
By looking at your paid keywords, in addition to organic, you are able to see if your competitors are paying for more visibility on your keywords.
Adding Keywords
If you want to add more keywords to your campaign, simply open the "Keywords" button and type in your desired keywords to track.
If you’ve reached your tracked keywords limit for your current SEO Toolkit tier, you can add more to your account by clicking the "Buy more keywords" button.
Another way you can add new keywords once your campaign is running is by using the keyword sandbox in the settings tab. Here you will be able to add additional keywords without having to rerun a campaign.

Deleting Keywords
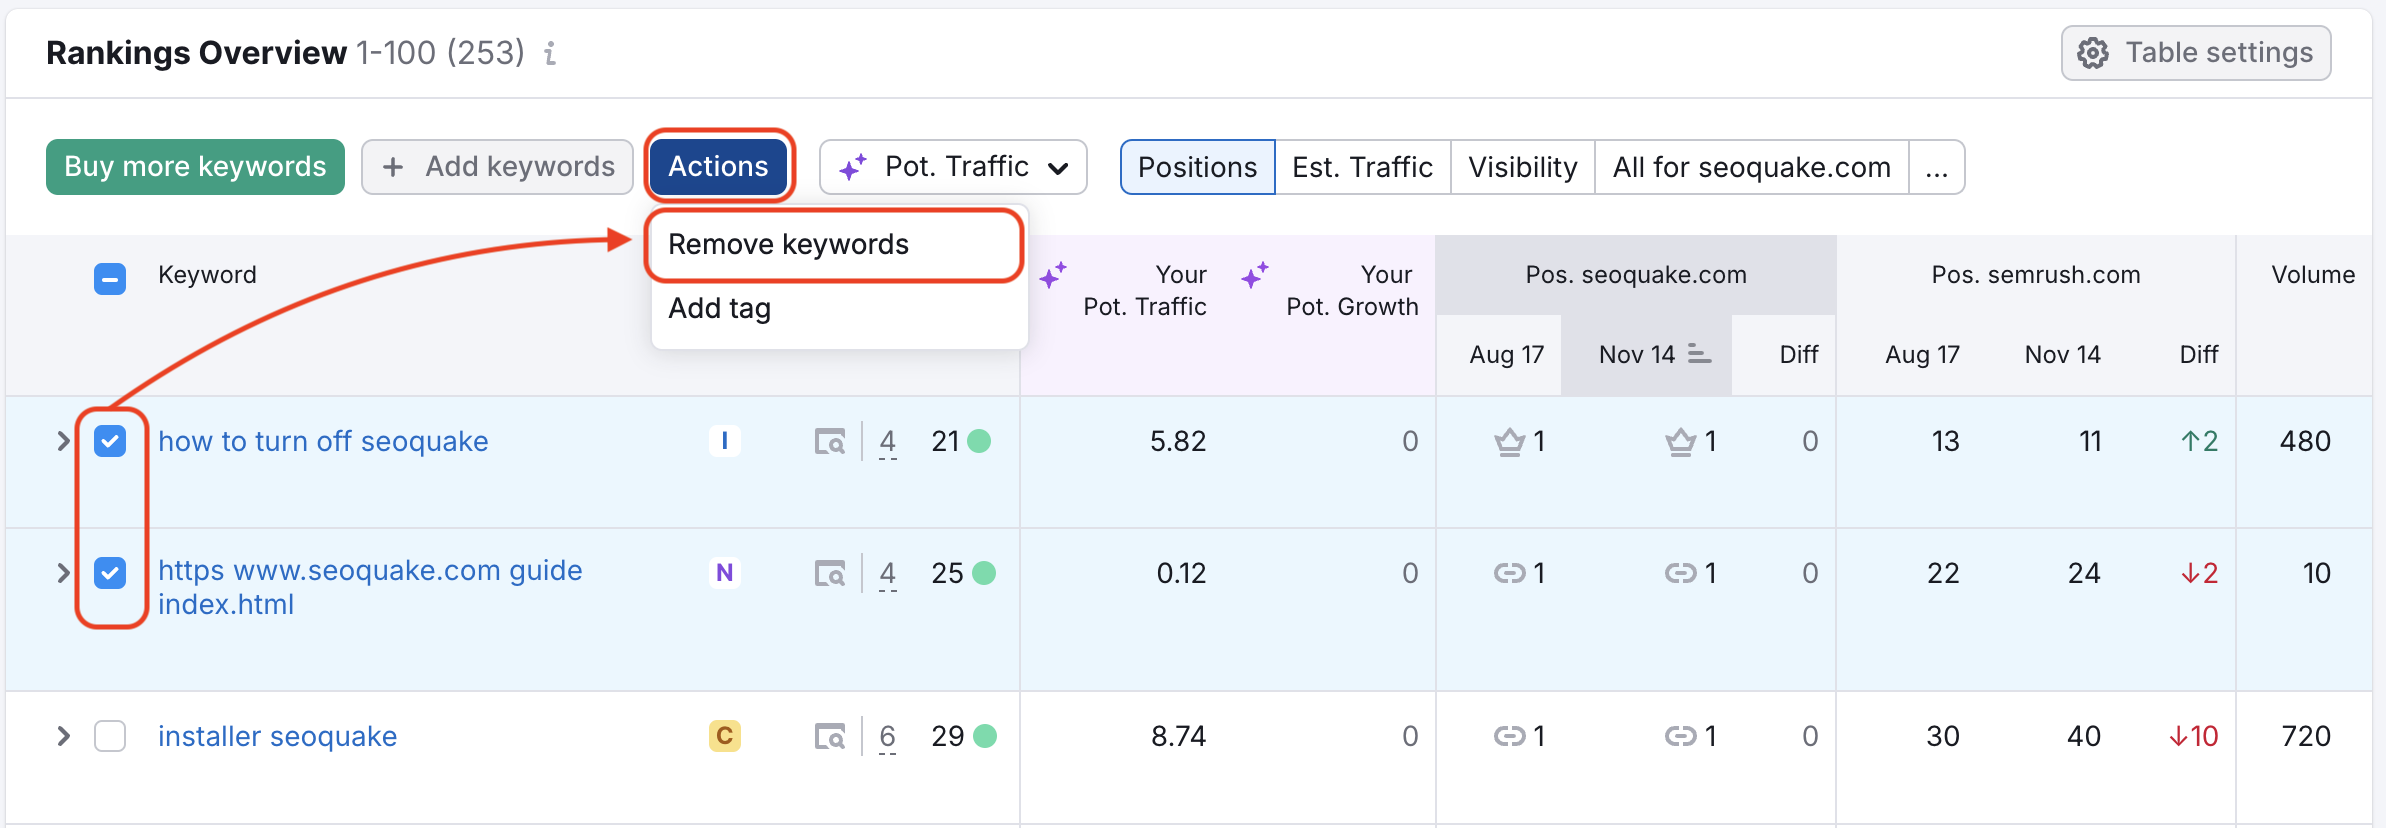
To delete keywords from your campaign, select the keywords with the checkboxes in the left column and choose "Remove keywords" from the "Actions" drop-down menu.
Tagging Keywords
Tagging your keywords will be essential for organizing larger campaigns. You can apply tags from the following places:
- Setup wizard
- Overview report
- Rankings Distribution report
- Tags report
- Pages report
- Competitors Discovery report
- Featured Snippets report
In the Overview report, your keywords will be listed in a table. Next to each keyword, there is a box to add a tag to the keyword. If you added any tags before, they will appear in an auto-suggest box.
If you would like to tag in bulk, select a group of keywords or all keywords in the table and click the "Actions" button above the table. You will be able to add and remove tags from the same menu.
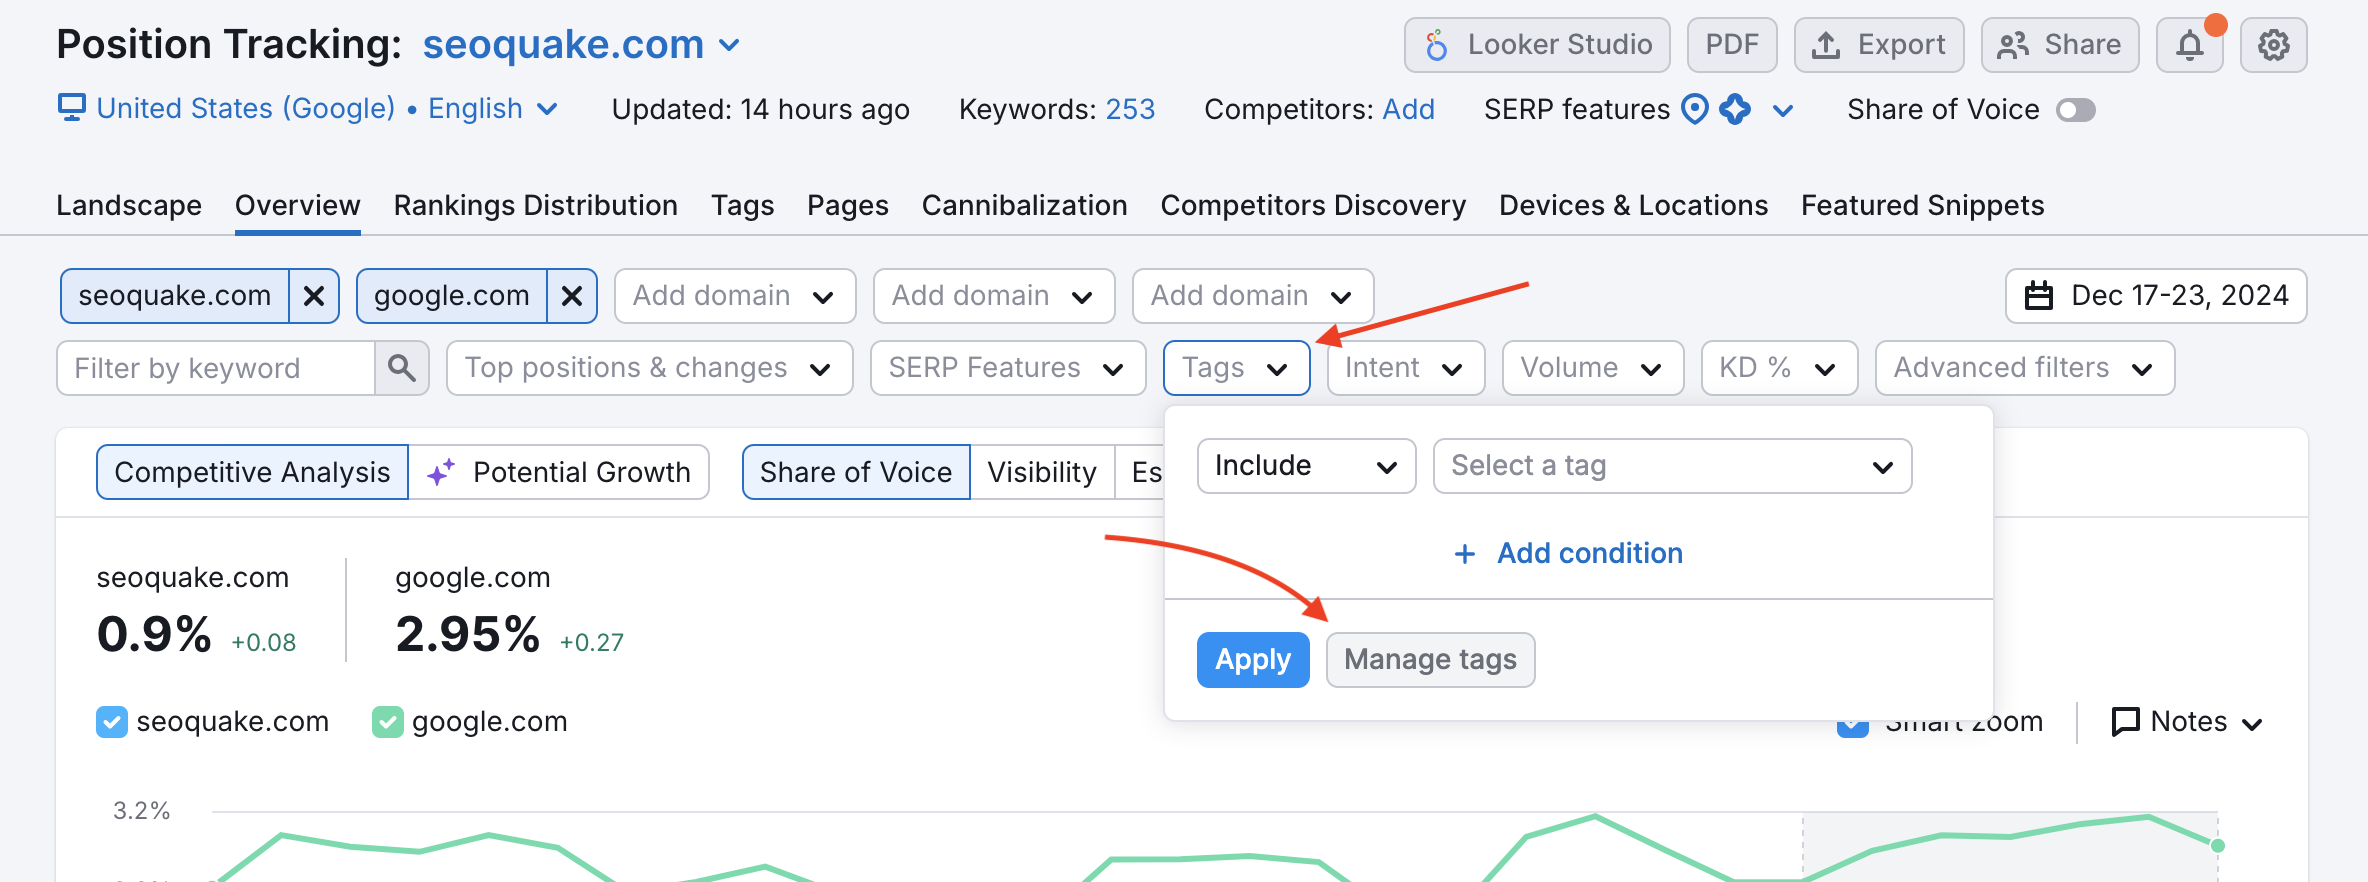
Also, adding and removing tags is possible from the "Tags" menu at the top of the interface. You can get to the menu by clicking the "Tags" button and then selecting "Manage tags" (see below). A new window will pop up where you will be able to apply the necessary changes.
After you’ve applied tags to your keywords, you can filter your reports by tag to analyze each keyword group. You can filter your reports to exclude specific tags as well, giving you more ways to analyze your set of keywords.
You can also combine multiple filter conditions at once using the OR/AND functions to analyze only the groups of keywords you need.
Advanced Filters and Tags
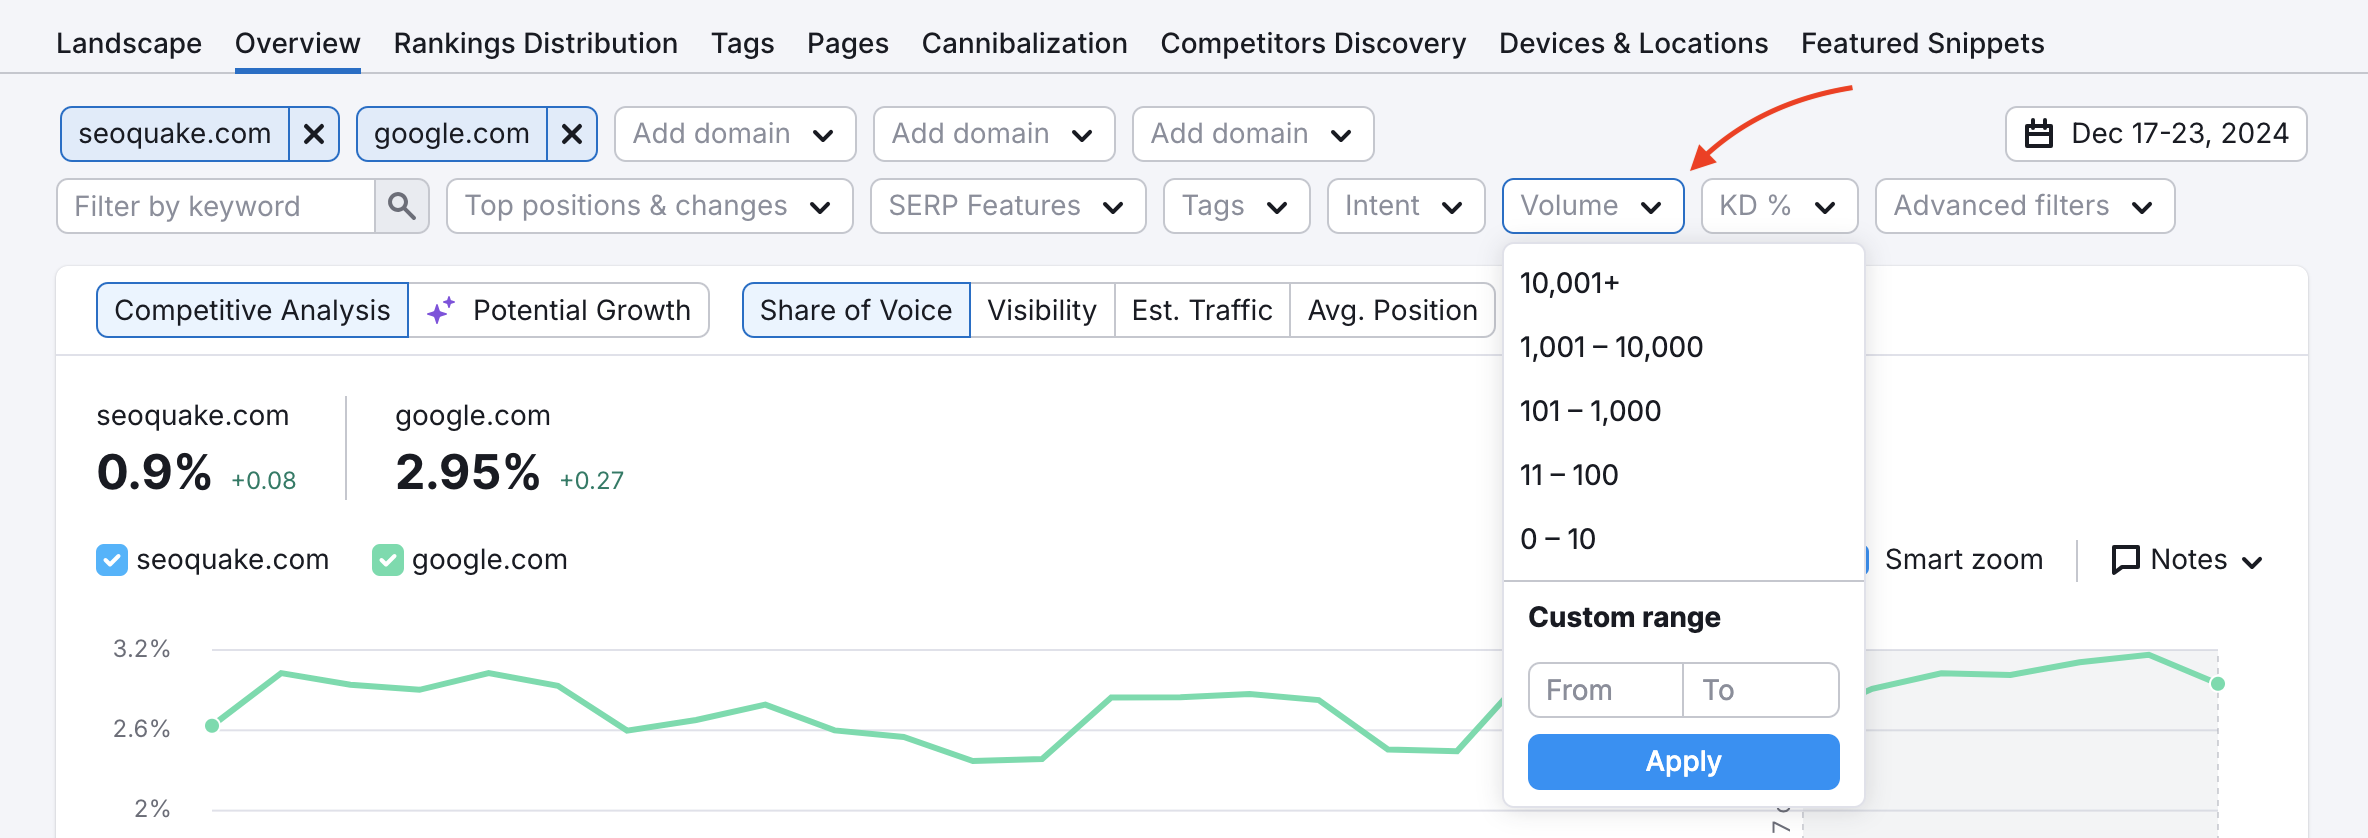
Advanced filters give you more flexibility in the way you follow your progress. One strategy for tagging your keywords is setting up tags based on metrics like CPC and Volume. Start by adding an advanced filter for keywords that have a high volume (greater than 1000).
Then, highlight all keywords sorted by this filter and apply a tag to label them "high volume."
Now you’ll have a quick way to look at your progress among the most popular keywords:

The same process can be used to tag a group of keywords with a specific range of CPC. Smart tags like this allow you to come back to your Position Tracking campaign and find the same group of keywords with a quick tag filter—rather than having to apply advanced filters every time.
Intent
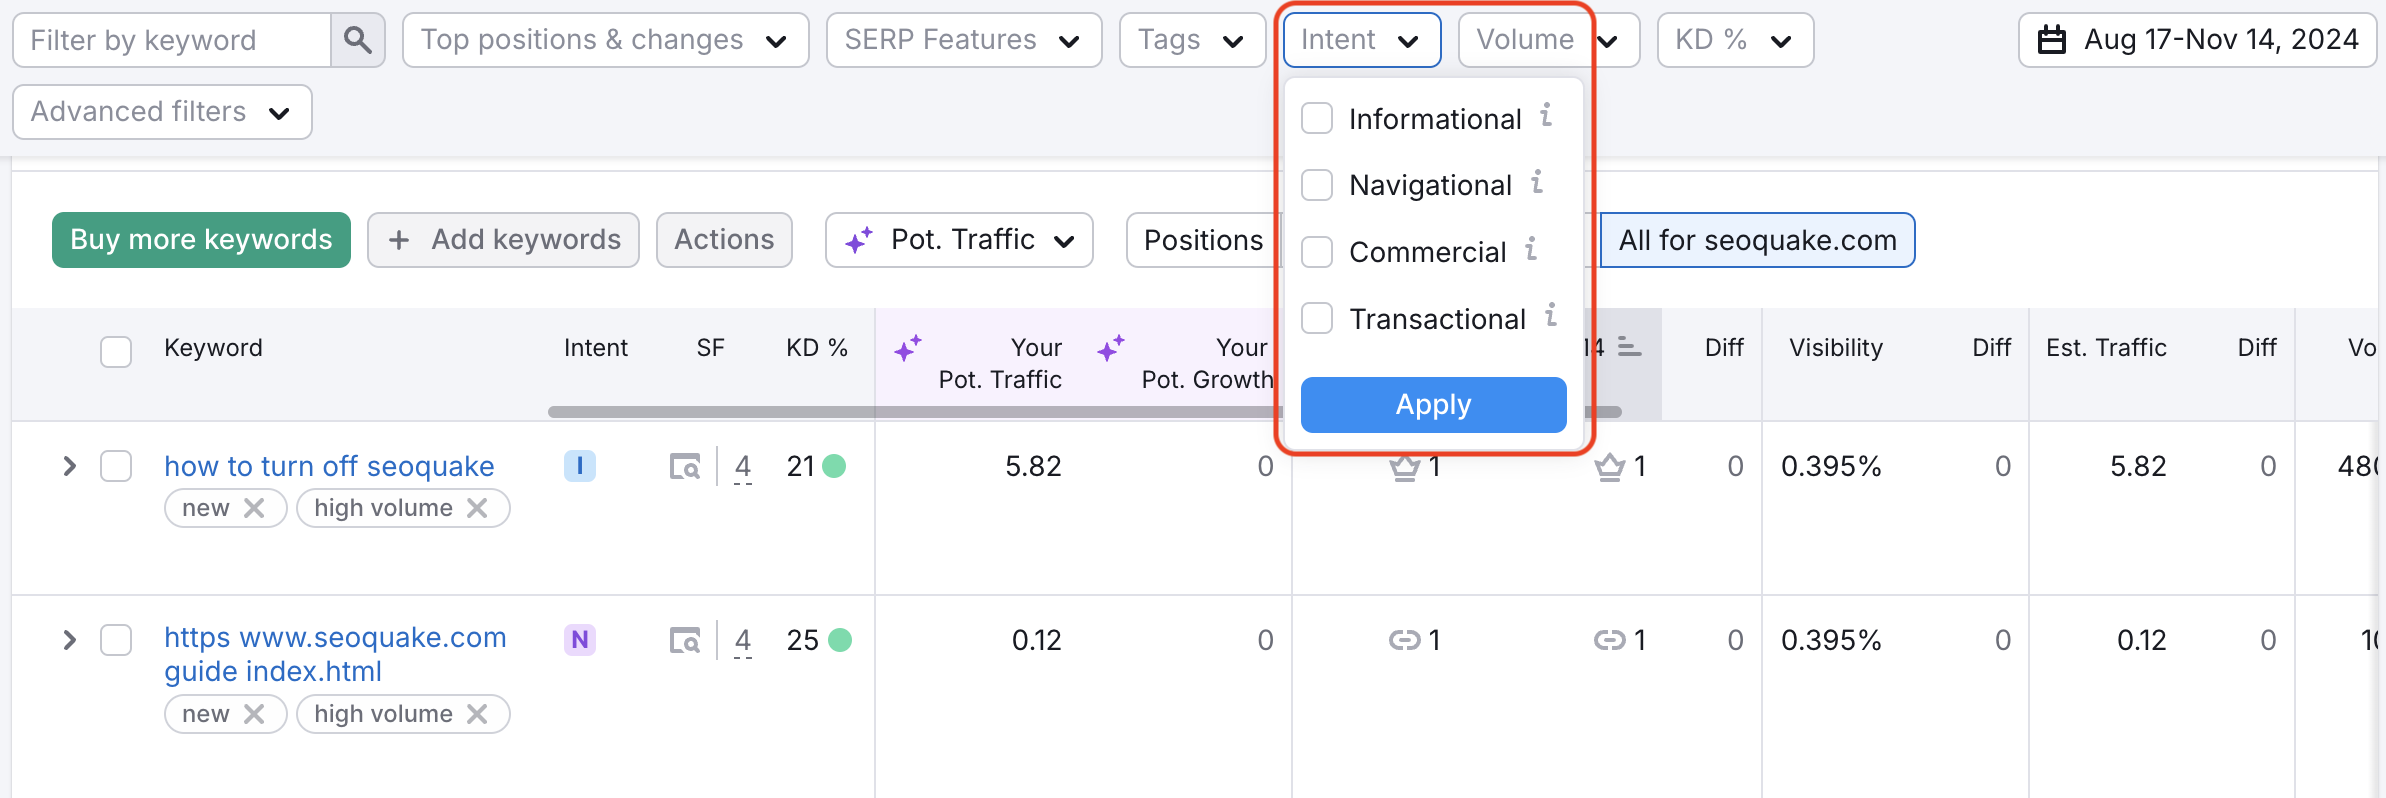
The intent filter allows you to quickly analyze a site’s organic rankings and visibility for the tracked keywords by search intent. This filter will be helpful to monitor how your or your competitor’s SEO campaign fulfills customers’ needs and affects the site's online visibility.
If your competitors outrank you, check their landings in the Rankings Overview table to see why they might rank higher than you. Then amend your content to match the searcher’s intent and satisfy the audience's needs.
You can select one or several intent groups to filter out the list of keywords in the table.
Local Pack Results
The Local Pack is the group of locally based results that appear at the top of a SERP after entering a location based query (see the example below).
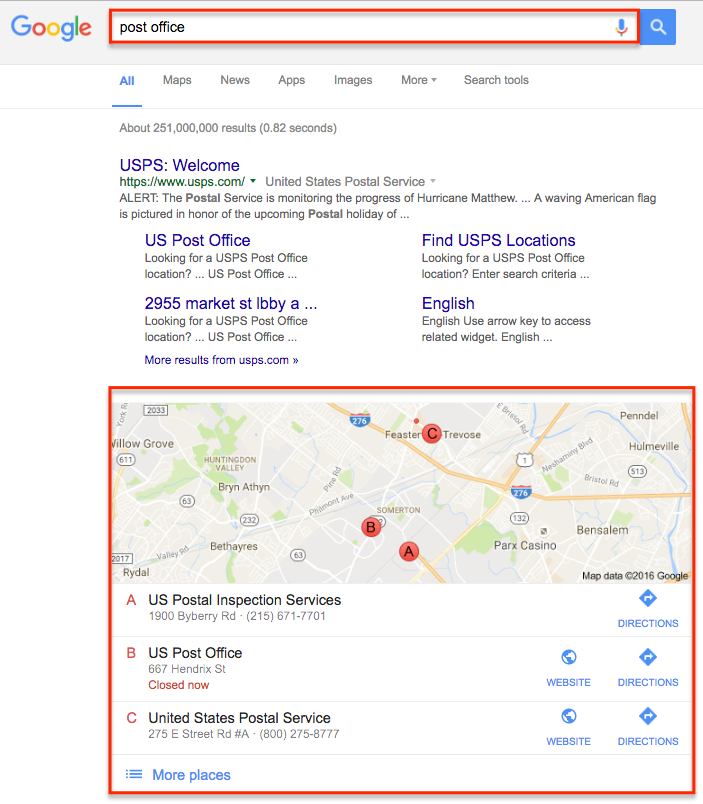
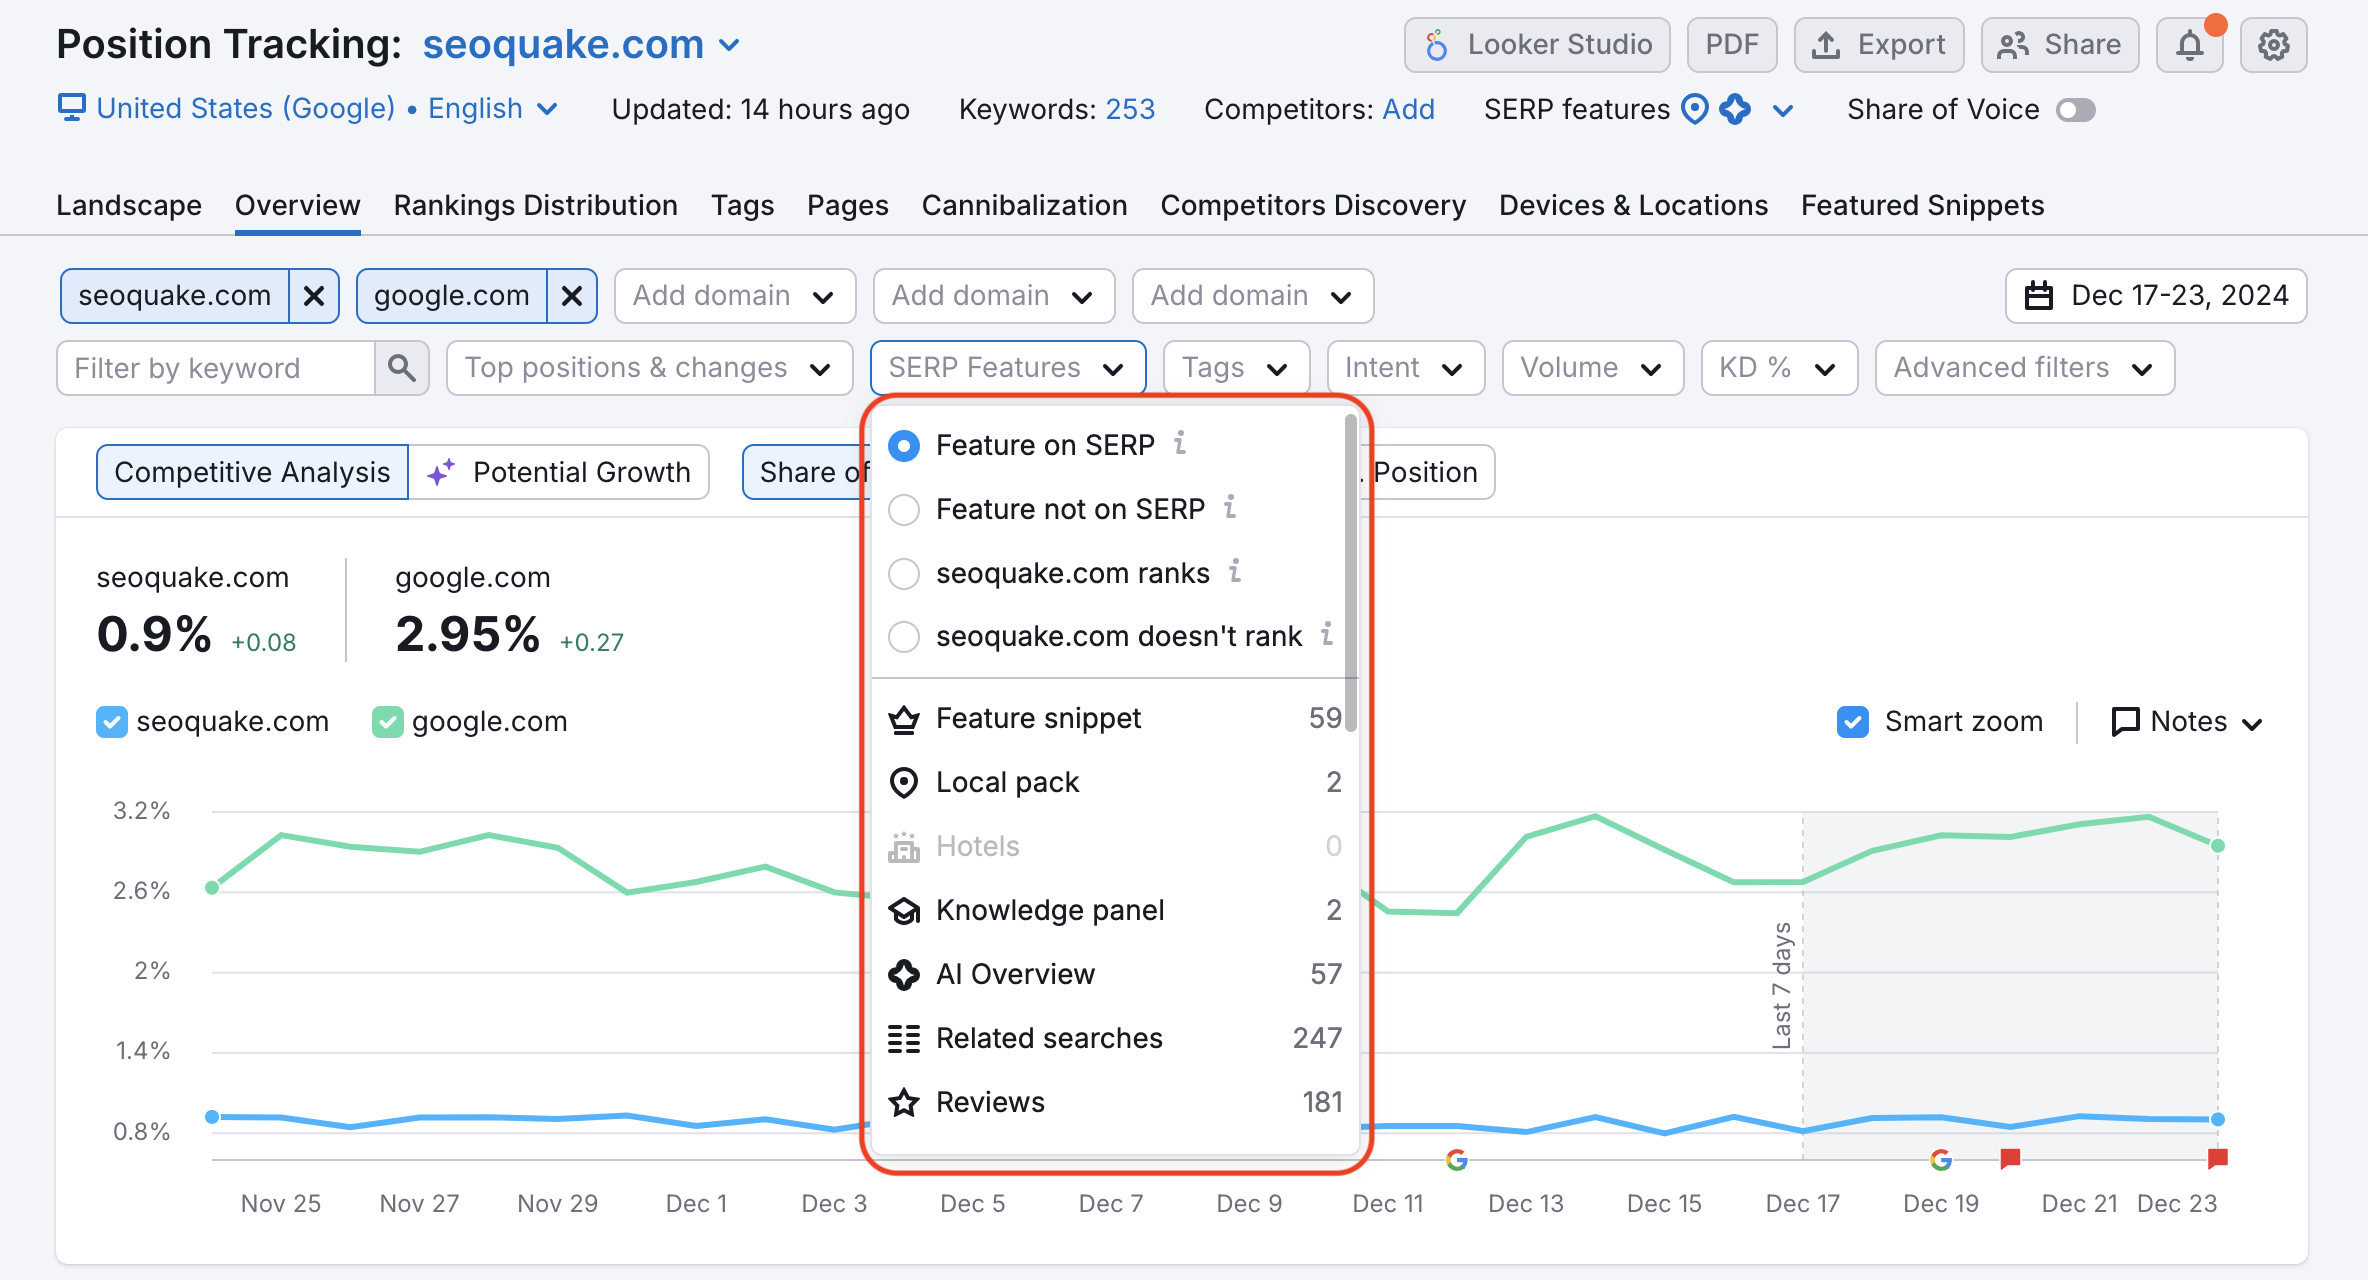
To filter your report to see all of the keywords where a local pack appears on the SERP, use the SERP Features Filter. You can select "Local pack" from the menu, and then also choose if you want to see keywords with local packs on the SERP, local packs NOT on the SERP, local packs on the SERP where your website ranks, or local packs on the SERP where your website does NOT rank. Filter according to what you're looking for.
This is a great feature for anyone running a Position Tracking campaign for a local website, as local pack results are more important than ever for getting local search traffic to visit your site. In the Rankings Overview table, you’ll see local pack results appear with a small pin-drop icon beside the rank number.
You can also trigger your local pack results by clicking on the SERP features checkbox at the top of your dashboard.

In addition to local packs, the SERP Features filter also allows you to identify keywords that trigger Featured snippets, reviews, AI overviews, site links, videos, top stories, instant answers, and more. For more analysis, we also offer a special Featured Snippet report to see your website's opportunities to be displayed in a Featured Snippet.
PDF Reporting
PDF reporting is huge when it comes to keeping your team, client, or boss up to date on the progress of your campaigns.
From the tabs Landscape, Overview, Tags, Competitors Discovery, or Devices & Locations, you can select the "PDF" button at the top right of the page to create a PDF export.
If you have several locations monitored in Position Tracking, you can use the Devices & Locations report to generate a report for all of them at once.

If you want to generate a report containing a single group of tagged keywords, simply filter the Rankings Overview table to your desired tag and export the report to PDF. The resulting PDF will only contain rankings information for the keywords with that tag.
You can email, schedule, or brand the PDF before exporting. You can brand a report by dragging or uploading a photo into the window and by adding your name and contact information to the header. If you don’t brand your report, it will have the Semrush logo and information by default.
Note: branded PDF exports are available only with the Pro tier of the My Reports suite.
After you’ve exported a report, it will be saved under My Reports, where you can access the PDF and edit/customize the elements of the report before downloading it again.
You can also export data in Excel, Google Sheets, CSV, or CSV semicolon in the following tabs: Overview, Rankings Distribution, Pages, Competitors Discovery, Devices & Locations, and Featured Snippets.
Scheduling Spreadsheet Data Exports
If you have a Business-tier SEO Toolkit subscription, you can schedule exports of Position Tracking data to be emailed to you on a daily, weekly, or monthly basis.
These scheduled exports are not the same as your regular weekly email updates. This export will be a spreadsheet (Excel file or CSV) containing more information.
Your options for scheduling exports include the Overview report, Rankings Distribution report, Pages, Competitors Discovery, Devices & Locations or Featured Snippets report. In order to schedule one of these exports, first make sure you are on one of these tabs.
Then, open the export option drop-down, choose schedule export, and set the parameters of your export to schedule. This feature is available only with the Business-tier SEO Toolkit subscription.

Campaign Settings
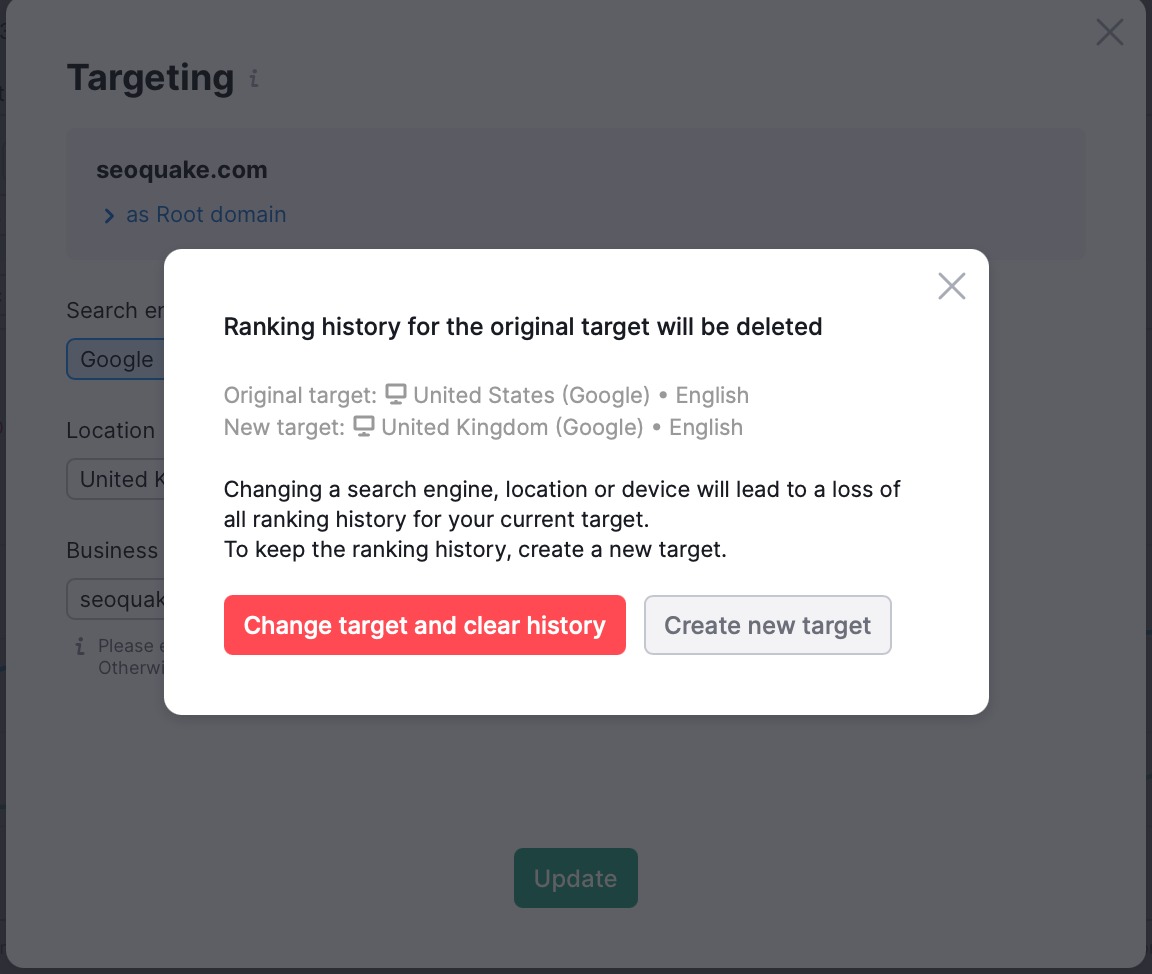
If you want to change the settings of your campaign, you can do so by clicking on the gear icon in the top right of the dashboard. The settings icon will let you change your domain to a subdomain, URL, or subfolder. You can also change your keywords, competitors, or triggers.
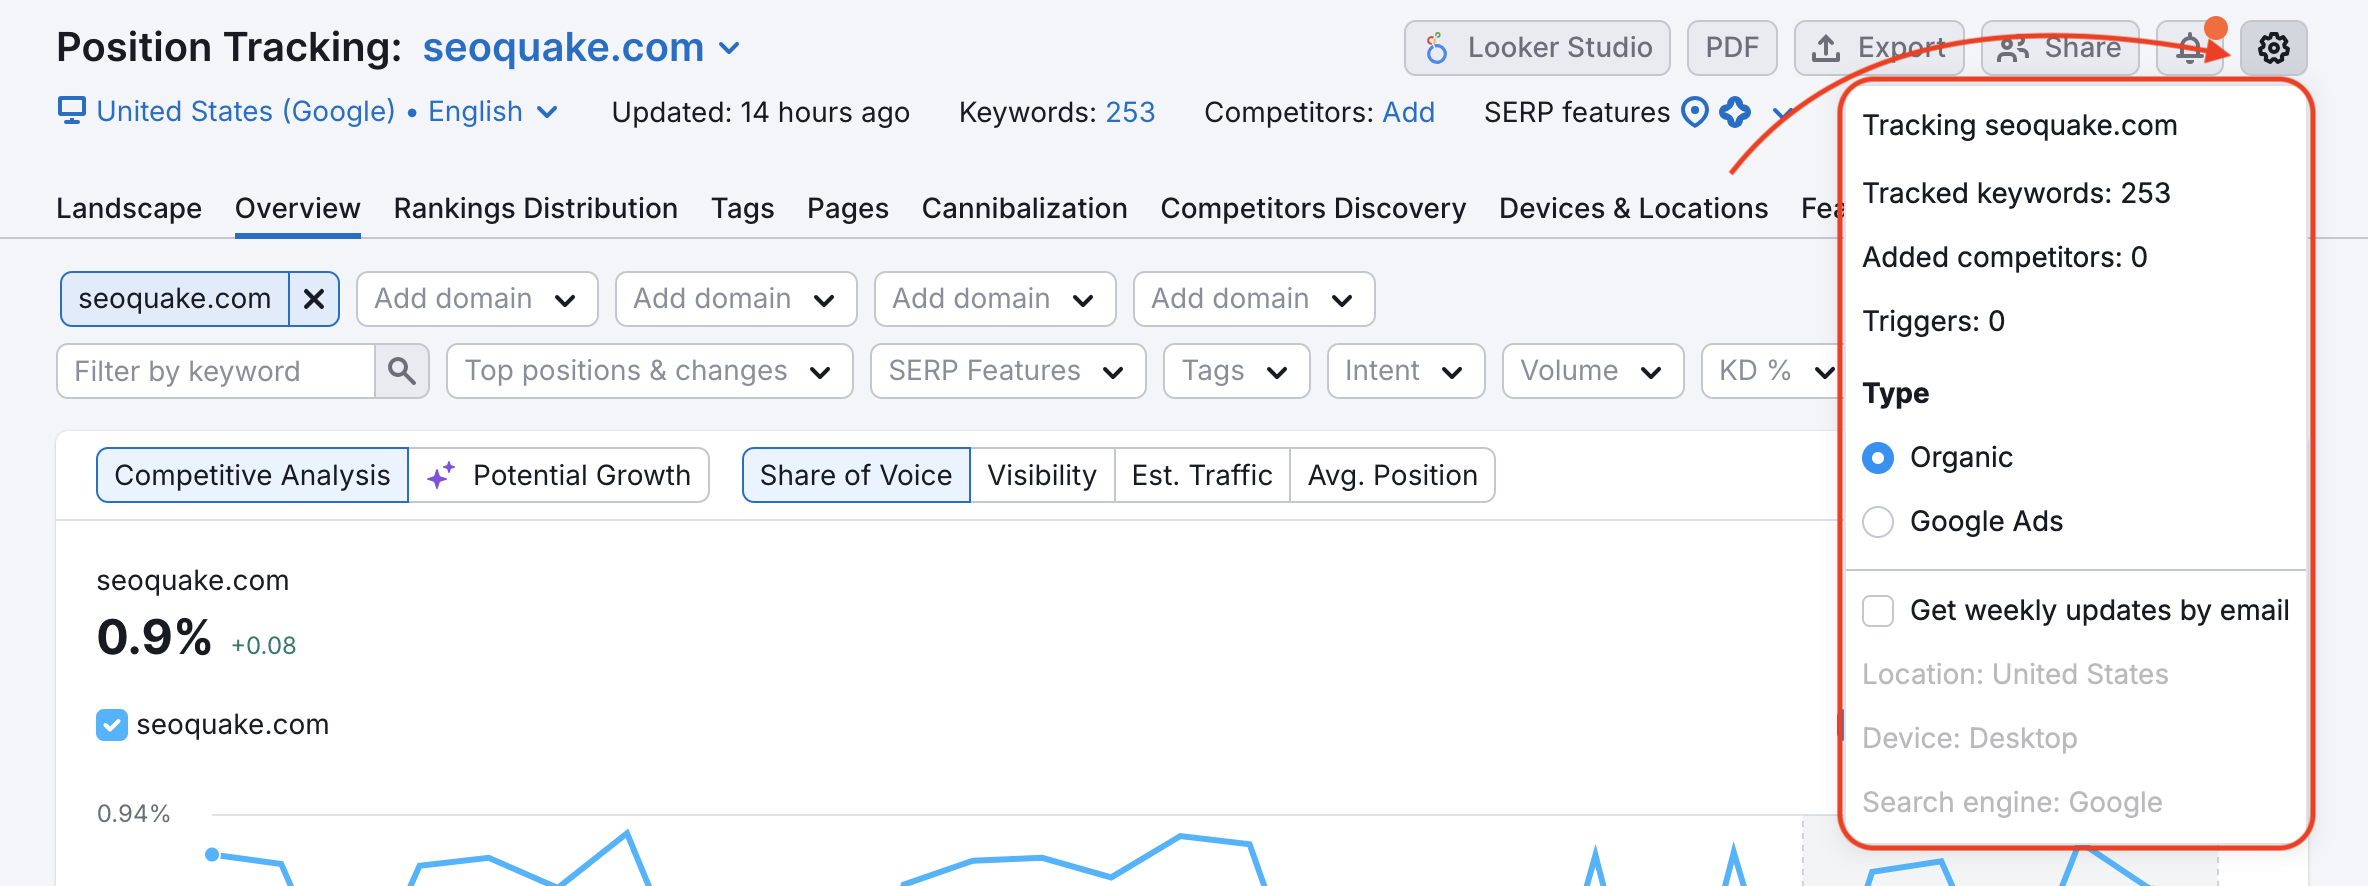
Along with changing the domain of your campaign, you can also change your location, device and search engine (to Bing, Baidu or ChatGPT). However, it's important to note that if you do want to change your location, all of your previous historical data will be lost.