This article will walk you through the steps of how to set up your Position Tracking campaign.
When you create your first folder in Semrush, Position Tracking is automatically configured and launched for the domain you provided. You can view the results by navigating to the Position Tracking tool from the left-hand menu or the home page once the initial crawl is complete.
For any subsequent folders you create, you will need to configure Position Tracking manually. To do this, create a new folder from Position Tracking and follow the prompts to configure and launch your audit campaign.
Step 1: Targeting
In the first step of the configuration window, right at the top, you’ll see the root domain of your campaign listed by default. However, you can change the area to track with the dropdown menu. This will allow you to choose between a root domain, subdomain, URL, or subfolder.

If you want to get the most data possible, we recommend that you start by tracking the root domain. But don’t worry! You can change these settings at any point after starting your campaign.
If you already know you want to focus on a very specific part of a website, this is where you would want to enter a subdomain, URL, or subfolder.
However, all rankings on subdomains, URLs, and subfolders will be stored in your historical data anyway.
Therefore, it’s best to start by tracking the root domain and experiment with looking at subdomains and URLs after your campaign has begun.
Search Engine and Device Type
Just below the domain dropdown, you will find the Search Engine and Device filters. You can change your search engine between Google, Bing, Baidu, ChatGPT, and Google AI Mode. As of now, tracking results on Baidu are available on the national level and desktop devices only.
Directly next to the search engines are the device types. Search results are different across desktops, mobile phones, and tablets so select the device that you want to track your marketing efforts on the most.

Note: Once your campaign is set up, the original location and device type cannot be changed. Please double-check your settings at this step before proceeding.
However, you can add additional campaigns after the initial setup to track a website’s search visibility across multiple devices (desktop, phone, and tablet), locations (down to the postal code level), and search engines (Google, Bing, Baidu, ChatGPT, and Google AI Mode). Please note that this feature is available only to users on the Guru and Business tiers of the SEO Toolkit subscription.
If your campaign is set up at the city level, you’ll have the option to toggle between local and national volume data within your campaign.
Location
Next, you will be able to choose the location for your campaign. You can set up a campaign to track results specific to a country, state/region, city, or zip code.
After entering your location, decide if you want Position Tracking to display the local or national volume of your keywords. Once your Position Tracking campaign is running, you can toggle local and national volume back and forth.

For local businesses or any location-specific campaigns, this step is vital for focusing the tool to track results in the areas you’re actually targeting with your website.
Local Pack
Finally, the last part of the campaign settings is entering your business name (if applicable.) This feature goes along with your local pack results. In order to track your site's local pack results, we need you to provide your Business name exactly how it appears.
This means not abbreviating or shortening your business name, or misspelling your name. With this, we can identify all of the keywords where your business has a ranking in a local pack if you're tracking local keywords.

Step 2: Keywords
After you configure your targeting settings it’s time to now add keywords to your campaign. When adding keywords you have options to import keywords from a .txt or .csv file, from an existing Position Tracking campaign, Semrush reports (Semrush suggestions), Keyword Strategy Builder, Google Analytics, and Google Search Console.
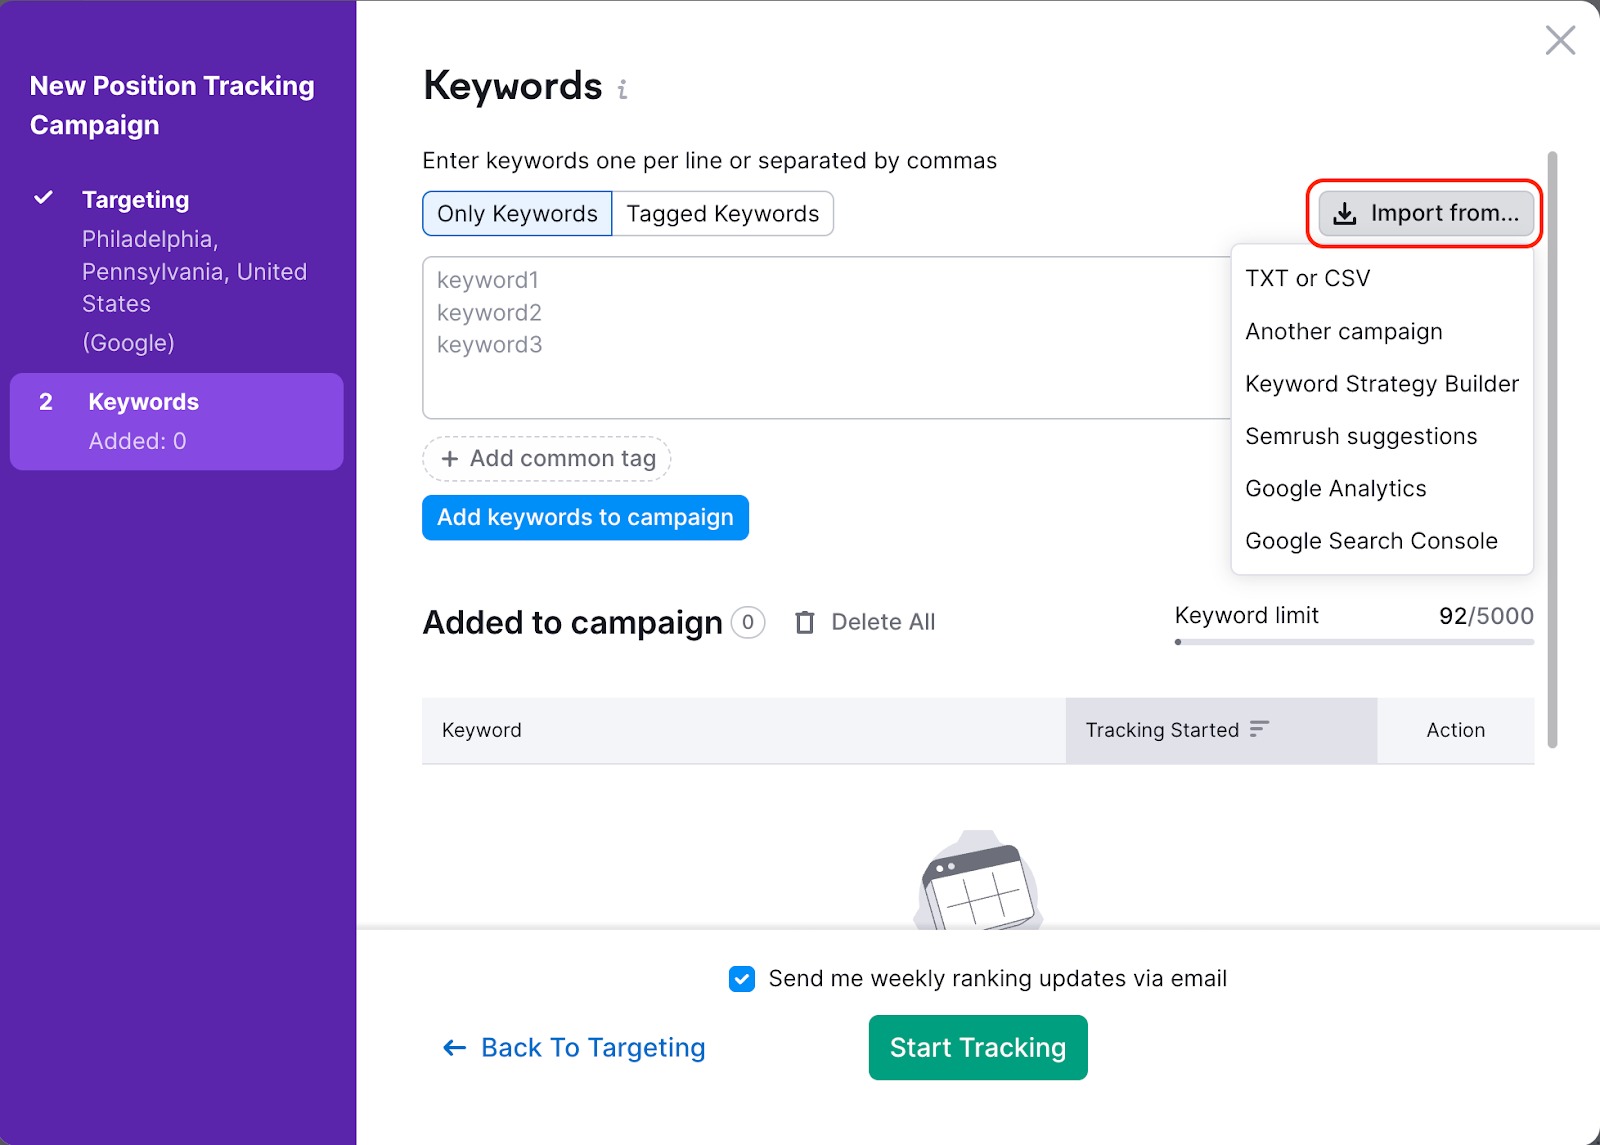
When adding keywords from Semrush, you have the option to add keywords from an Organic Positions report, Advertising Positions report, and the Keyword Magic Tool Related keywords, or Broad Match keywords.
Importing from Google Analytics will add your list of keywords found under GA4 > Acquisition > Overview > View manual campaigns > Session Manual term to your Position Tracking campaign. If you do not see manual reports please refer to this guide.
When uploading the .csv file, make sure to include all of your keywords in the first column. Any info in other columns will not be imported.
When you add keywords to your sandbox, you have the ability to tag groups of keywords before adding them to the campaign.
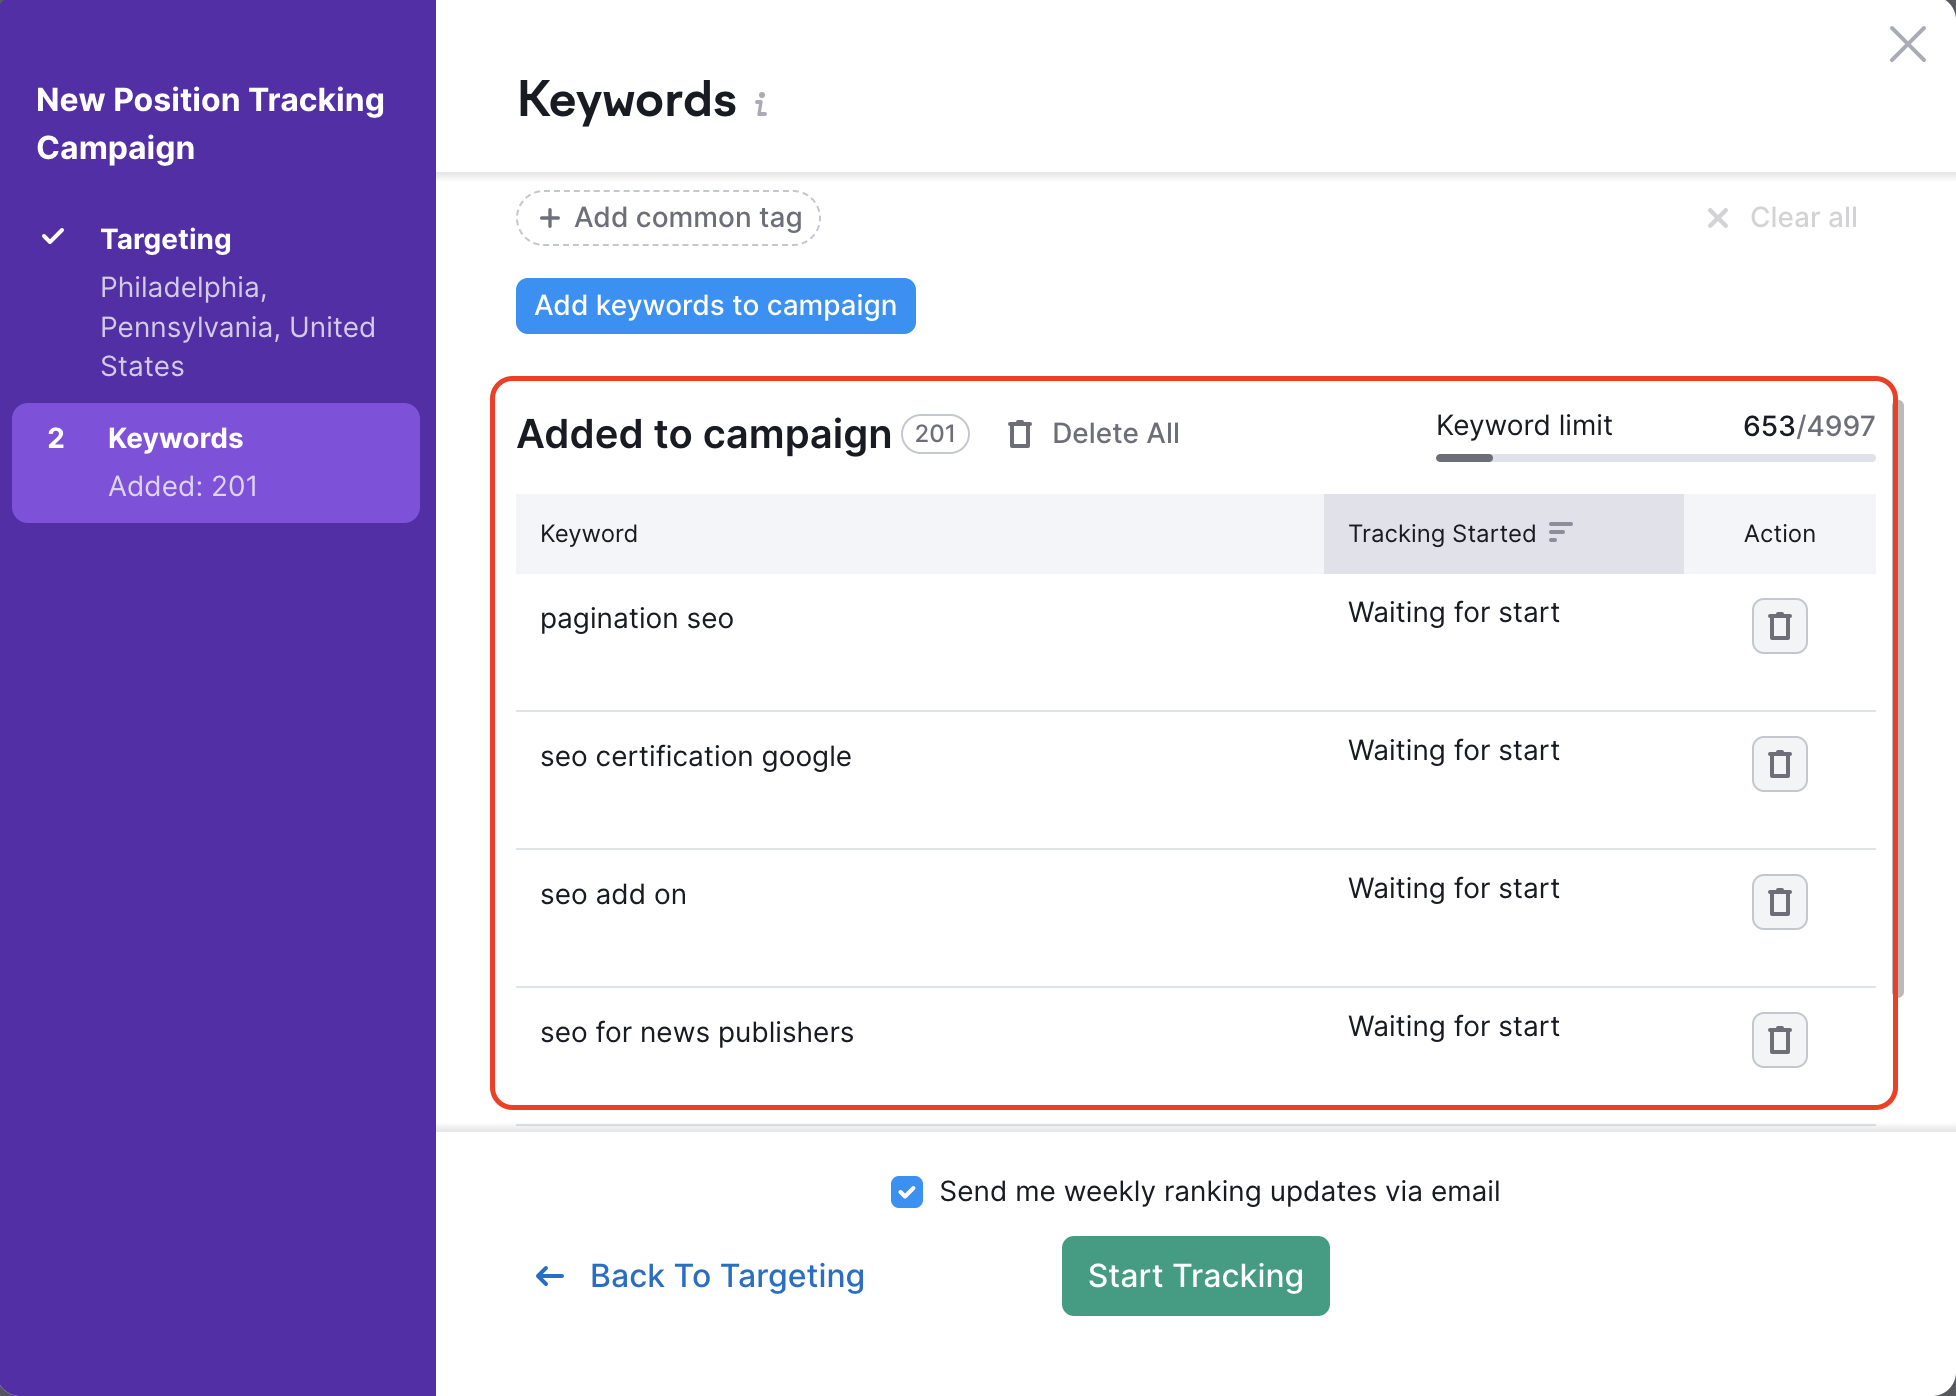
If you want the same tag for all of the keywords in your sandbox, all you need to do is click the button "Add common tag" below the sandbox.
However, if you want to create multiple tags for individual keywords, you will need to separate each tag with a comma to its corresponding keyword in the Tagged Keywords tab.
The more specific you are with the tags you apply to the keywords in your campaign, the easier it will be to analyze your rankings for different keywords as your campaign progresses.
Review your target keywords in the Added to campaign list before starting your campaign and choose if you want to receive weekly updates by email with the small checkbox above the green "Start Tracking" button. These updates will give you a summary of how many keywords your domain has ranking pages for in the top 3, top 10, top 20, and top 100 results on Google. Once you hit the "Start Tracking" button, your campaign will begin gathering data.
Updating or Deleting Your Campaign or Folder
If you make a mistake while setting up and would like to fix it, or if you’d like to add more keywords to your Position Tracking campaign after you’ve already set it up, you have a few options.
First, you can add or remove keywords within Position Tracking Settings, which is the same window that you used to set up your Position Tracking campaign the first time. Find it by opening the Settings menu, and then selecting Tracked Keywords.

If you're on a Guru or Business SEO Toolkit subscription, you can use the Multitargeting feature to create an additional campaign—without needing to delete and create a new folder. However, you cannot create duplicate identical campaigns, so you will need to choose a different search engine, device type, location, or language in order to proceed.
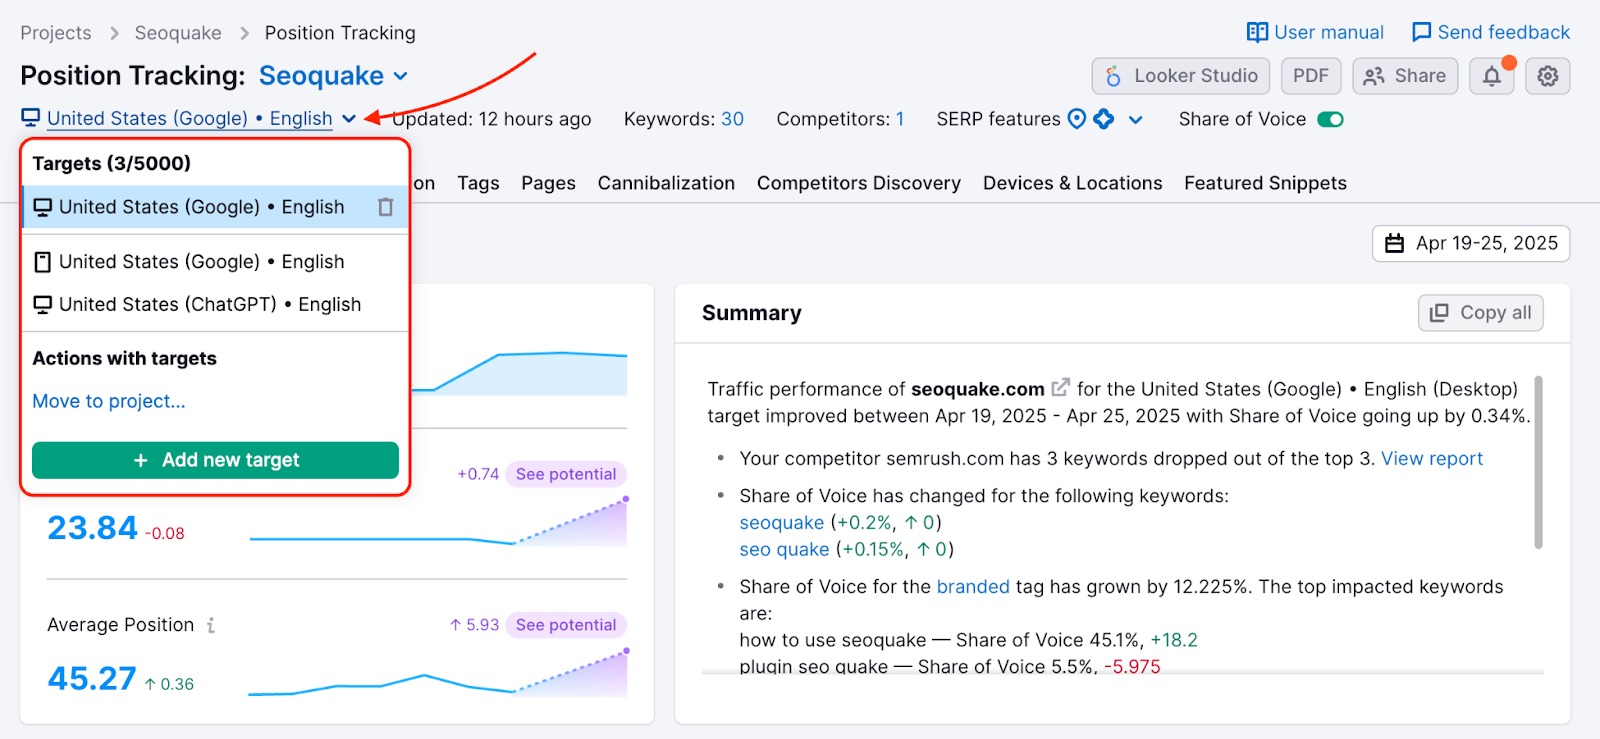
If you have multiple Position Tracking campaigns set up using Multitargeting, you can delete any that are no longer needed through the location drop-down in the top menu of your campaign. To do this, click the location currently being viewed to expand the menu, then click the trash bin icon next to the campaign you want to remove.
If you’re not using Multitargeting, don’t have an SEO Toolkit subscription, or have a Pro SEO Toolkit subscription, you won’t be able to delete your Position Tracking campaign without deleting the entire folder. Please note that deleting a folder will remove all Website Monitoring data you’ve set up—not just Position Tracking.